
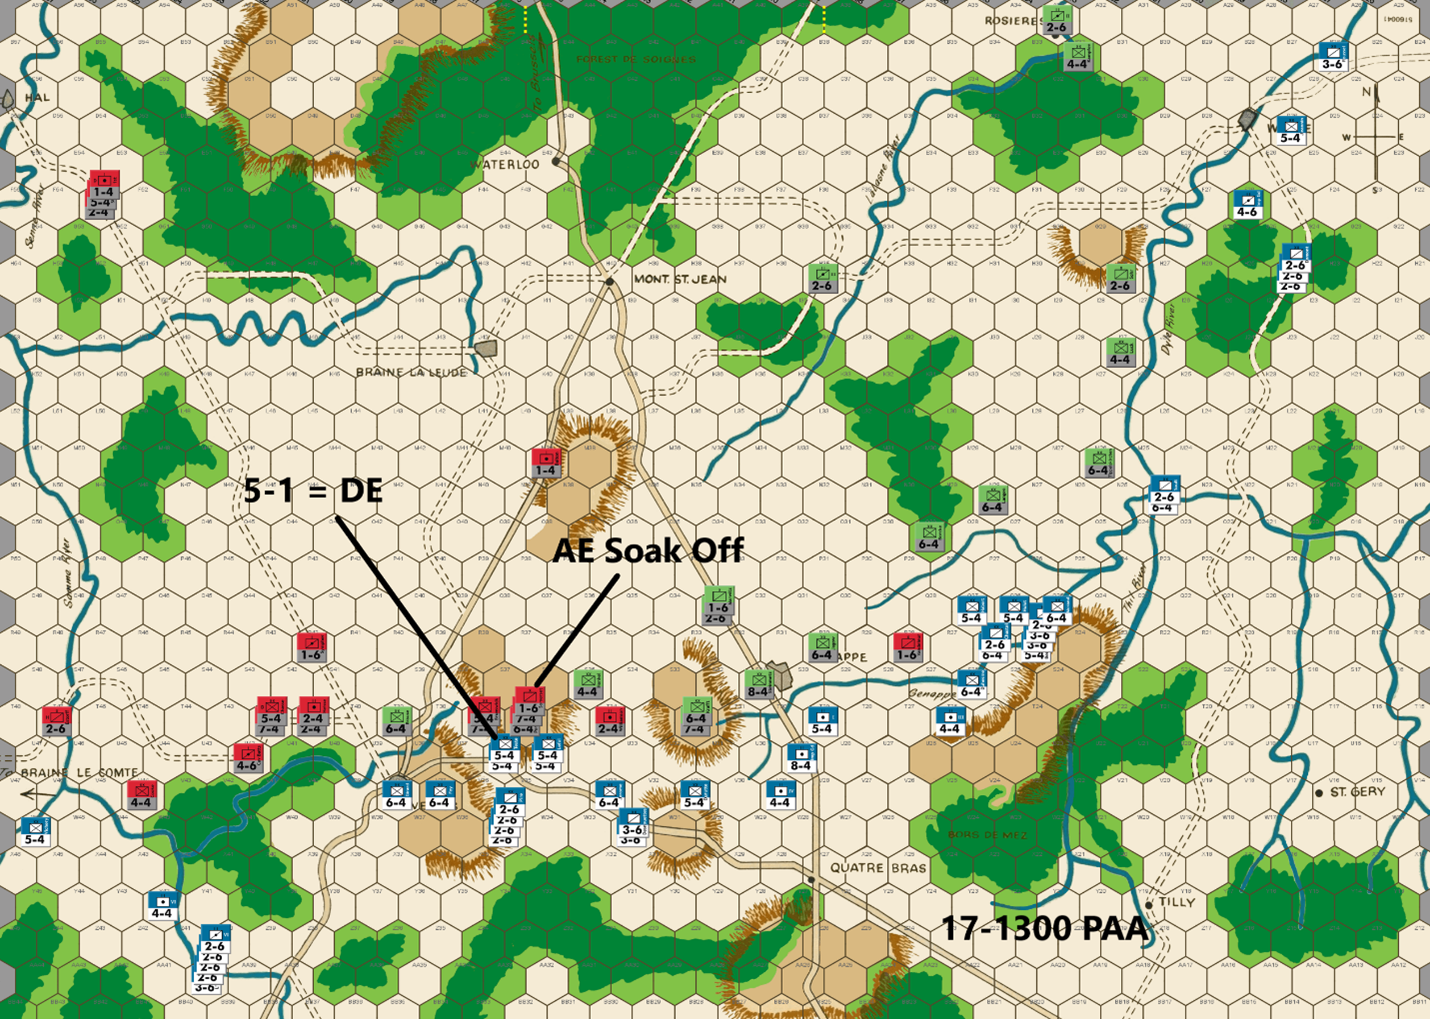
Bert: Morning has broken here in Belgium. Reports have come in that Ney’s attempt to break the river north of Nivelles has been easily repulsed. The news from the east was much more to Napoleon’s liking as Grouchy’s assault to breach the Thil River, was a rousing success. Interestingly, the defensive position of hex Q24 versus R24 turned out to be critical as there was no available retreat route for the DB2 result that was rolled. An attack against R24 would have been at 1-1 odds at best and would have left Stulpnagel with a safe retreat route. I’m quite certain that the attack would not have been ordered under those circumstances.
Overnight, the PAA commander responded to these brazen attacks by sticking to his “no counterattack” strategy and more importantly, withdrawing from the center heights to the south of Quatre Bras. Overall, the French high command is pleased with that outcome of the operation because getting that withdrawal was the expected response should the Thil River attack be successful. I personally, would have left a minimal force to hold the hill one more turn and possibly force me to risk an exchange result against a doubled defender, but I understand Ed’s decision in this case – especially since I’ve shown that I’ll take “reckless” attacks.
To be fair, I don’t think my attack was all that reckless. As I’ve explained a couple of times, the French player almost certainly must take and win a couple of low odds attacks relatively early in the game against a strong PAA player, which Ed certainly is. My thought is that when I take my low odds attacks, they should be done to yield a great result and not just some random kill in a non-critical point of the map where there are a bunch of defenders to respond with their own counterattack. My Thil River attack fit the ‘chance to yield a great result’ description almost perfectly. The fact that Ed allowed it to be a surround attack made my decision easier. So yes, I got a lucky result…, but as happened with the similar attack versus T39, sometimes your timely low odds attacks are crushed, but sometimes they get paid off.
Despite successfully crossing the Thil River last turn, I didn’t see a great option for exploiting that attack by joining up with the main force coming through the Quatre Bras pathway. As previously noted, my general strategy in this game is to try and keep Ed spread out over as much as the board as is reasonable and a good way to do that is to order the Tilly Corridor force to head northward instead. The good fortune on my risky attack mucked up Ed’s strong defensive positions that had the north nicely sealed up. Now, the weakened position looks potentially exploitable. At a minimum, I should be able to keep his forces spread out as his advantage is getting to go toe-to-toe with me in a confined space and I would like to avoid that for as long as possible.
My northward move is happy to find a 3-1 attack against Thumen. I was a bit surprised to see Ed allow me to get that attack. M22 is a tough hex to defend because on a DB2 result, I will choose to retreat the defender to M21 via L22 – a zig-zag retreat. My infantry unit will advance into the hex, basically pinning his cavalry unit as the surrounding wooded hexes prevent him from escaping a likely follow-up attack. If I get the exchange, I’d rather lose the 5-factor infantry unit and keep my Imperial Guard Artillery piece on the board, especially with its extra movement factors. The almost guaranteed taking out of Thumen will open up a path to Wavre in the next couple of turns or force Ed to offer up additional Prussian targets to impede that thrust.
Elsewhere this turn, I’m content to take what was given to me in terms of the two blocking units. I saw a couple of quite tempting low odds targets this turn, but I decided to not push my luck against either of them. These are what I looked at, but decided not to pursue:
· The most tempting was a 1-1 or 2-1 surrounded vs Cooke near Braine le Comte. My preferred defensive position at this point of the game as the PAA would be to place the unit at U47, where a 2-1 is not possible and a DB2 doesn’t cause elimination.
· 1-1 (or a 1-2 or a 2-1) vs Picton at T37. The PAA is a bit brittle right now and taking out that piece at a relatively low cost would make the next couple of turns quite tough.
There are a couple of places on the board that I am trying to maximize the advantage of the movement ability of my horse units.
· I put several units to threaten Braine le Comte while still having the ability to join attacks at Nivelles. Since I chose not to take the low odds attack vs Cooke in the far west, it means that the PAA reinforcements are going to be coming down that road from Braine le Comte instead of Hal. This threat is still part of my attempt to continue to tie up some Anglo-Allied units as the deal with my far western forces and might let me dispose of an extra blocking unit along the way.
· Less threatening are the units I moved to the Tilly area. They are a couple of turns away from being able to help the heroes that broke the Thil River, but that position lets them get a start that way, if I chose to, while still allowing them to be within range to swing back to the main force that will almost certainly be dealing with more blocking units the next turn or two.
My one interesting choice that I made was to potentially sacrifice an infantry unit by occupying U40 with it. This placement partially blocks the defensive shuffle from U42 to T39 that the PAA commander likes to employ. If Ed is willing to put a sacrificial unit at U39, it would cut off a retreat by Marcognet. While Ed can muster enough force to take a 5-1 attack against my unit, to do so will mildly compromise his ability to get to the prime defensive hexes (T36 in particular) on the following turn with a 7-4 unit. Ed can use the Prussians to fill that gap, but they are dealing with their own mess in the center. If he takes a less than 5-1 odds attack, he runs the risk of an exchange and since he can’t really have one of his 5-factor units join this attack without soaking against V40 (He doesn’t have a small soak off unit within range of V40!), an exchange will cost him an even bigger unit or multiple units. My best guess is that Ed will take a 5-1 against my unit but won’t give up a piece to guarantee it being surrounded.
Joe: In the West (Nivelles and the Braine le Comte Road):
With one exception, this is a generally effective French move: it blends a
nice mix of positional menace with a reasonably aggressive continuation of
the French offensive. Consider, for instance, that the units at AA40, Z41
and Y40 (which total twenty-eight factors) threaten the Allied 4-4 at V47
with a surrounded 3-1; and that, in concert with the 3-6 at W38, they also
threaten a 3-1 versus a single 5-4 at V44. Looking east to the Nivelles
area: A pair of units clear away the PAA delay unit at V35, while the
lion's share of the French infantry deploys in and around Nivelles as a
ready reserve for a potential fight to the north or east. On the other hand,
there is one odd feature of this move that stands out; and that is this:
because the PAA commander has seen fit (mistakenly, in my view) to
completely empty T41 –
choosing to begin moving the Prussian 4-4 that
previously occupied that hex east towards Blucher's command in the center
–
the French player has decided to respond to this suddenly unguarded
stretch of the Allied line by pushing a single 5-4 forward into the
forest/river hex at U40. And although this is certainly an interesting and
aggressive move, I suspect that because of the availability of local PAA
reserves units and the immanent arrival of a large contingent of
Anglo-Allied cavalry reinforcements, it may turn out to be a bit more
speculative, and a lot less pressurizing than the French commander thinks
it is. Of course, it needs to be admitted that this advanced unit
absolutely does require that the Allied commander forcefully respond to it,
and this at a time when PAA units are widely dispersed and defensively a
bit over-stretched. In light of that, this French gambit might actually
have made a lot more sense were it not for the failure of other distant
French units to push west towards Quatre Bras, after their shocking victory
against the Prussians on the Thil River. However, since these Tilly French
did not move to threaten the western Genappe defense line but, instead,
pivoted to the north, Blucher's Quatre Bras Prussians have been able to
rush desperately-needed reinforcements west –
just in the nick of time –
to bolster the Anglo-Allies at Nivelles. And this, at least in my opinion,
is the strategic development that –
when combined with the natural
robustness of an adequately manned PAA Samme-Nivelles defensive position
–
converts the advance of Marcognet from an interesting tactical ploy into a
futile sacrifice. In any case, although the adventuresome French unit in
question cannot be ignored and will most certainly be attacked because of
the threat it poses to PAA defenders in T39; the real question for the
French player should probably have been: how difficult will it actually be
for the Allied player to organize such an attack, and at what odds? And to
my mind, the answer to the first question is "not very," and to the second
is "pretty good." Now, with all that said, there are a couple of
adjustments that, were I the French player, I would be very tempted to make
to this move; to whit: a) I would forgo the move into U40 because, at
least to me, it doesn't appear like it is going to be that difficult for
the PAA to mount an attack at 3-1, or better odds, and therefore, that the
nuisance value of the move is transitory, at best; b) I would replace the
stack in V40 with two 6-4s and the 2-6; and c) the newly freed-up 3-6 would
go to W39, and the two now spare 5-4s would move, along with Marcognet at
V37.
In the Center (the Quatre Bras Heights and Gap): With the Allied position around Quatre Bras slowly crumbling, the French commander decides to play it safe and attacks only the sacrifice/delay unit at Z25. In addition, because of the unexpected French success farther to the east last turn, the Emperor detaches four cavalry units from his center reserve, and sends them galloping north into the Tilly Corridor as reinforcements for his victorious subordinate. And while the French player's careful approach this turn may not be dramatic, it nonetheless appears completely reasonable, especially since it is highly likely that Napoleon, because he is already gambling on dangerous moves at Nivelles and in the Tilly Corridor, sees no compelling reason to risk the possibility of additional French casualties by launching low-odds attacks against the Prussian 6-4s at V26 and Y28.
In the East (the Tilly Corridor): In what is becoming a pattern, the
latest French move produces yet another big surprise! Rather than
capitalizing on his successful assault against the PAA defense of the Thil
River line by pushing southwest in order to threaten a crossing of the
western Genappe River and, at the same time, to also reestablish contact
with the advancing French center, this Tilly commander chooses to pivot
northeast and move the bulk of his forces to the banks of the eastern
Genappe. In support of that move, he also launches a surprise attack
against the doubled Prussian 2-6 guarding the N22 ford (and, naturally,
scores another DE). On the whole, this is –
at least in my view –
an
unexpected but quite interesting move that manages to radiate threats in
all directions. To be honest, while the 3-1 assault against a doubled 2-6
–
with the 30% risk of exchanging a 5-4 –
is somewhat questionable, the
rest of the move, notwithstanding its indirect effect on events at
Nivelles, is actually quite solid. And now that this French expedition's
two major weaknesses –
a paucity of cavalry (only three units) and limited
combat power (thirty combat factors) –
both seem about to be rectified
with fresh cavalry reinforcements, this newly strengthened force should be
able to "play hob" with the Allied defense along the entire length of the
Dyle River.
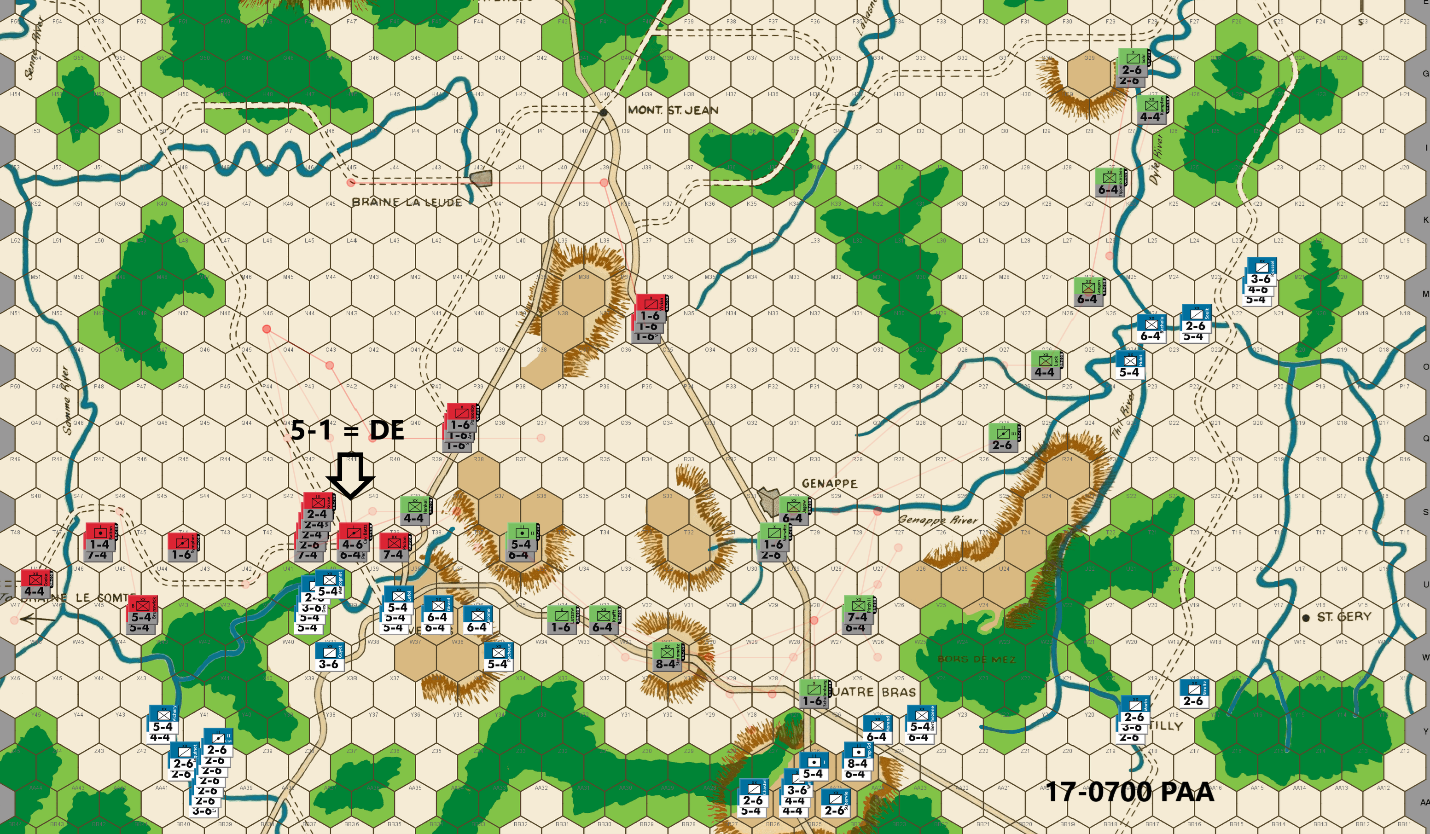
Ed: Bert has 28 factors within range of attacking across the Samme River against V47. He has 31 factors counting the cavalry on the road at W39 within range of attacking V44. (Sometimes players overlook units on the road to Nivelles.) And he has an infantry on the river at U40 that must be dealt with. I can attack it from double positions, so I’m not sure why he left such an appealing target for me to hit.
V44 must be protected as a French penetration here this early in the game would be a serious problem. The only good option is to double stack Chasse with Brunswick (making a pair of 5-4s) to 3-1 proof that hex. I think Clinton (7-4) is more valuable near Nivelles than protecting V47. So that leaves means Chasse (4-4) who will need to move U47 to be 3-1 proof. The French can now occupy W46 and gain the western side of the Samme River. But that is dangerous ground for them as they are subject to surround attacks with their backs to the board edge.
I want a 5-1 attack (the best I can do) against the French infantry at U40 so there is no risk of an exchange. That means leaving V41 open to French occupation. That is not desirable but less dangerous than it might look at first glance. The adjacent woods block any French support on their shoulders if they want to advance. And they are fairly easy to contain.
My attack on the French infantry at U40 is a success as I get the DE. I double stack infantry at T36 to deter a low odds attack and have more units for potential counterattack.
Bert has some options in this sector next turn. He can advance on the western Samme River. He can occupy V41 and/or attack any of my defenders at T39 to T41. Given the recent turns, I anticipate an aggressive response. He has taken a couple of hits in this sector, but he still has a very large force. And this is the best I could come up with.
At Quatre Bras, I use the typical blocker and 3-1 proof infantry. I have several infantry choices – a 6-4, a 7-4, or a double stack. I don’t want to give him a 2-1 possibility and decide on a 6-4 and 7-4. Of course, that leaves open the possibility of the Imp Gd FA taking a 1-2.
Bert deals me another surprise in the Tilly Corridor by switching his attack northward with a 3-1 on my doubled cavalry unit. Although I would not have switched directions with the Tilly force, it is hard to argue with his success as the result is DE. Drat. At this point, I don’t know if the French are serious about continuing north or simply were looking to create Allied casualties. In any case, a pair of 6-4s 3-1 proof the Dyle River while a pair of 2-6s and a 4-4 move north to await any French advance.
Joe: In the West (Nivelles and the Braine le Comte Road):
I confess that I was a bit skeptical about several key aspects of last
turn's Allied moves on this front (e.g. especially those of Alten,
Perponcher, Chasse and Henkel) and, although the French have suffered a
minor reversal at U40, and things seem to have temporarily stabilized along
most of the Samme-Nivelles front, I still see several potential problems
for the PAA going forward. First, the one hex fallback of Cooke, although
prudent, now leaves the river hex at W46 undefended; this is not a game
changer, but it does give the French player the opportunity to lengthen the
front by sending a relatively small (twelve to fifteen factors) mixed
infantry/cavalry detachment north to threaten nuisance raids along the west
bank of the Samme River, if it is not blocked. Second, any unsupported
Allied unit at U42 that is smaller than a 6-4 is now vulnerable to a 3-1
attack, unlikely as such an attack might actually be. Third, any unit at
T39 smaller than Steinmetz (an 8-4) is now also vulnerable to a 3-1
(soak-offs, or not). Fourth, and by far the most worrisome, the hillock at
T36 will be vulnerable to a 3-1 –
unless defended by Steinmetz –
as early
as the 1100 game turn. Fifth, the Prussian units that are currently
propping up the Allied defense at T36, and along the Nivelles-Quatre Bras
primary road, will soon –
because of the steady offensive progress of the
French center –
have to withdraw east to take up the defense of the western
Genappe line. And finally, because of French progress on the Nivelles front,
and in the center, it looks like Napoleon will likely gain full control of
the Nivelles-Quatre Bras primary road, at least one, and maybe two turns
earlier than usual.
In the Center: The situation in and around Quatre Bras is deteriorating
rapidly and, had the Tilly French not switched their focus back to a push
against the eastern Genappe and points north, might already be in crisis.
The only real good news on this front is that the area around Quatre Bras
can still be effectively screened with a single sacrifice/delay unit, but
that will change next turn. Unfortunately, that –
at least in my view –
is not the most concerning problem on this front, as it turns out that,
because of Blucher's heavy commitment of Prussian units to the defense of
the west, literally none of the small number of remaining Prussian
"heavies" that were not sent west, have actually been moved to S27 and S28
in anticipation of the coming battle along the Genappe River line. In
short, Jagow at S30, and IIIrd Corps Horse Arty at Q26, although helpful,
are simply not going to be enough. That said, I would have definitely made
a few changes to this move: going from west to east, I would have sent all
of the same units west, except for one 6-4, and I would also have taken a
chance on a French low-odds attack by posting only a single 3-1 proof
blocker, instead of two, at V27. The few units that were left would have
been moved onto the Genappe River. In any case, the present situation will
have to be corrected, and soon, as viable single hex delay positions are on
the verge of disappearing in the center.
In the East (the Tilly Corridor): Although it’s hard to tell from turn to
turn with this particular French player, it looks like his attention is
currently fixed on the northern Dyle and Wavre river crossings; on the
other hand, given what has already transpired in this sector: who knows?
For the time being, at least, the Dyle River line seems relatively secure,
and I personally wouldn't change a thing on this front. Moreover, when it
comes to current and future PAA defensive dispositions along the Dyle, the
Allies enjoy another advantage besides the "force-multiplier effect" of the
river line: in the far north, there is a large copse of woods just south
of Wavre and east of the Dyle River that –
because of its associated
movement penalties –
makes things a lot easier for the Prussian units
defending along this stretch of the river. Regrettably, the current
stalemate on this front is probably only temporary: once the French Tilly
contingent receives its cavalry reinforcements, then these defenders will
probably need cavalry reinforcements of their own. And as a final note of
interest, the eastern French contingent currently numbers only thirty
factors (which is insufficient for a 3-1 against a doubled 6-4); however,
the four French cavalry units that are now galloping north to join their
Tilly comrades-in-arms will dramatically change that calculus. Hopefully,
if and when that fight happens, it will occur on the Dyle, and not on the
La Lasne River.

Bert: Ed finally conducted an attack! Naturally, it was one which did not require a soak off nor did it risk an exchange. In hindsight, my move to allow that attack was a mistake by me. Somehow, I miscounted the units and thought that he was going to have to include a 1-factor unit in the attack or he would have to put a unit in U39 to prevent a counterattack. I think I had anticipated one of the Anglo-Allied 2-factor units being used to screen V34, but that was easily handled by a Prussian unit instead. The plan was for me to follow up his attack with an attack of my own vs the 1-factor unit and a soak off. The idea being to continue to try and maximize attrition for the PAA side as he would have been forced to attack again, costing more soak offs to hold the river line. Anyway, the dice properly punished me for my mistake and didn’t bail me out with the 30% chance of a DR result! The only good news is that I think the Prussians are a bigger threat for most counterattacking and so every time one of those units are used as a screening unit instead of an Anglo-Allied unit, that is a tiny win for the boys in blue.
At this point, I’m going to remain patient with the attack to break through the river and T36 hilltop defense line. I expect to get sacrifice units to feed on and focus on getting the main sector forces to sync up. With Ed’s defense spread out across much of the board, I’m hoping it will be difficult for Ed to hold the row T defense along with the Genappe River line.
Speaking of that river line, my swinging of my forces back and forth in the Tilly corridor is probably making some dizzy! I’ve shifted a heavy chunk of my force that attacked northward last turn to swing back across the Thil River. If my calculations are correct, I should be able to breach the eastern portion of the Genappe River next turn as the III Horse Artillery unit is the only unit that Ed can defend with at Q26. An early breach of that river line is usually a good outcome for the French player.
I haven’t given up on forcing Ed to defend all the way to Wavre as 12 factors are still heading that way. That’s enough to get a 3-1 attack vs a lone 2-6 defender behind a river. I’ve dispatched three additional cavalry units to do any of these possible missions:
· Head to Wavre
· Added to the Genappe River attack force
· Force the defense to still cover the the southern portion of the
Dyle River
· Get recalled back to the main front
I really don’t know what their orders will be since it continues to depend on how the PAA commander sets his defensive positions. I just like having my cavalry using their movement factors to spread things out instead of just sitting behind my heavy infantry as they plod forward, often a hex row at a time.
One interesting positioning choice I made this turn was to put some units at AA29. Their purpose is to make hex Y31 less than an optimal defensive hex for the PAA next turn. That hex is often filled with a 6-factor unit on this coming turn, to combine with Steinmetz holding W31. Typically, Y31 would only be able to be attacked from Y30 and the French can’t get a 3-1 attack against it. My placement at AA29 makes a 3-1 or more attack possible and so it hopefully breaks that defensive position and forces Ed to employ plan B (whatever that is) instead.
Finally, now that his 0700 reinforcements have arrived, Ed allowed me to breach the river near Braine le Comte. Keeping with my overall strategy of spreading out the PAA as much as possible, I’m committing forces to try and traverse the river over the next couple of turns. I doubt that Ed will worry enough to launch a counterattack there, but if he does, it will likely cost him a soak off unit, which is fine by me. Ideally, he will once again need to have some of his units tied up to deal with my forces making that incursion.
Joe: In the West (Nivelles and the Braine le Comte Road):
Starting with a look at the situation in the far west, the Allied voluntary
abandonment of hex V47, has allowed the French to establish a narrow
bridgehead across the Samme River at W46. This is a feeble threat, at
best. However, while it is unlikely that the local French commander will
be foolish enough to make a major effort in this area –
notwithstanding the
eighteen factors of cavalry positioned one move away at AA40 and Z41 –
it
is also unlikely that he will fail, at least for the time being, to
maintain some version of this threat in order to draw a few more Allied
units than usual toward this position, and away from the center. To that
end, I have one "nit" to pick with this French move, I think that it would
have been better to have posted the 4-4 and 3-6 along with Vichery in W46;
this move is a bit more threatening (even if it is mainly bluster) and
might succeed in drawing a more serious response from the PAA commander
than the 5-4 would, by itself. Interestingly enough, the French player has
also seen fit to deploy eight factors of cavalry at W39, a position from
which these units can actually strike as far west as V44. This means that,
at a time in the game when the far west should be getting steadily less
relevant to the planning of both players, the Allies still find themselves
under pressure from their foe. Briefly looking farther east to the area
around Nivelles, we see that the main body of the Left Wing of L'Armee du
Nord has continued its methodical push east along the Nivelles-Quatre Bras
Road and has picked-off a single PAA delay unit in the process. Of more
interest, however, is the situation pretty much in the middle of the
Nivelles battle space. There, a 3-1 counterattack (with two soak-offs)
against Cav. Batts in T38 has –
because of the earlier Allied assault
against Marcognet now become possible, but the French player (wisely, I
think) declines this uneven contest, as he also does with the same type of
3-1 attack versus Picton at T39. In point of fact, the risk of a protracted
(and crippling) attrition battle is far too great in both of these
instances. A far better (and safer) target –
with no river at an
advancing attacker's back –
is the increasingly exposed hillock at T36.
Quite understandably, the PAA commander is also aware of both the increasing
vulnerability of this position, and of the obvious tactical advantage its
uncomplicated terrain offers to an attacker, and responds accordingly; to
whit: he garrisons the hillock with two Prussian units (for a total of
eleven combat factors, doubled) in hopes of retaining his hold on the
position (if only temporarily), even if one of the two defenders is either
retreated or eliminated by combat. In theory, this Allied defensive ploy
(or something similar) should be enough to dissuade the French player from
attacking for at least another couple of turns. Nevertheless, once
advancing elements from the French Left Wing finally meet-up with units
from the French Center signifying that the Nivelles- Quatre Bras Road is
completely in French hands (probably on or about the 1300 game turn), then
the likelihood of an attack against the PAA defenders at either T36 or T32
–
regardless of the PAA player's actions –
will increase exponentially.
In the Center (Quatre Bras): Action in the center follows a now familiar
pattern: the French push north across the Heights, and through the Quatre
Bras Gap until they encounter an Allied delay unit, which they promptly
eliminate. The only thing that makes this particular French move a little
different from previous moves is that, in this case, a lone stack separates
from the main body and detours into an out-of-the-way AA29. The reason for
this move –
although I strongly suspect that it won't be necessary in this
particular game –
is to set up an attack against Y31, should the Allied
player attempt to establish a block in the center, with Steinmetz at W31,
and a 6-4 or 7-4 at Y31. Disappointingly for the French player, however,
is the fact that the PAA player could well have a completely different
blocking move up his sleeve. It turns out that, because the French stacks
at Y27 and Z27 total only twenty-one factors (and cannot be reinforced once
they move into Y28 and X28), and assuming also that the Allied player is
willing to risk a basic 2-1 from the Imp. Gd. Foot Arty, Duhesme and
Subervie against his only 8-4, then he can block French western movement
off the Heights –
at least for a turn –
by posting a 3-1 proof Steinmetz
at X29.
[I should note, at this point, that the fact that these two French
stacks totaled precisely twenty-one factors, and that the Imp. Gd. Foot
Arty was present –
a unit, let's face it, that was born to exchange
against Steinmetz –
set my "Spidey Sense" to tingling about this
situation: I couldn't help but wonder if this wasn't a devious French
gambit to lure Steinmetz into the open where he could be attacked at
2-1; but, in any case, more on that later.]
Finally, in terms of changes, I think Berthezene is wasted at Y26 (the two
3-6s on that hex are adequate in this situation) and would have been better
placed at Z27.
In the East: The record of the French expedition into the Tilly Corridor
has, thus far, been a saga of successful gambles, punctuated by unexpected
plot twists. And, as we probably should expect by now, the current French
move stubbornly sticks to that story line. Which is to say: This French
commander –
clearly the most audacious and luckiest of Napoleon's
subordinates –
who began his Tilly campaign by aggressively driving north
into the Corridor in spite of being numerically outnumbered by the Prussians
to his front, yet who did not hesitate or waver: instead, just when it
looked like the road to Wavre was his ultimate goal, he chose to suddenly
wheel the majority of his units west to attack and successfully break the
Prussian defense of the Thil River, without losses; and then, after a
victory that miraculously cleared a path along which he could have moved to
reunite his small force with the French center, he suddenly pivoted and
marched north yet again; this time to attack and break the Allied defense
of the eastern Genappe, again without any losses. In view of this
prologue, it is probably no surprise that this French commander's latest
move has turned out to be both unorthodox and unexpected; and because he is
no stranger to risk, and has been tempted –
at various times in this
campaign –
to move both to the west and to the north, he decides to split
his small force into two unequally-sized detachments, and to then do both.
The larger contingent –
composed of a mix of infantry and cavalry
(totaling eighteen factors, exactly enough to attack a single Prussian 6-4
in the open) –
pushes west towards the French units now debouching out of
the Quatre Bras Gap; the smaller group –
also a mix of infantry and
cavalry (totaling twelve factors, exactly enough to attack an exposed 4-4,
or a doubled 2-6) –
races north towards Wavre and its nearby Dyle River
bridges. Finally, there is the matter of the cavalry units dispatched from
the center, just last turn, and obviously intending to join-up with one or
both of the two now separate Tilly contingents at some point in the future.
As things currently stand, the ultimate mission of these cavalry
reinforcements –
originally four units, but now paired back to three, and
presently positioned at S20 and R21 –
is not yet clear, but a reasonable
assumption is that they are probably intended to aid the small French
contingent attempting to raid the Dyle crossings around Wavre. And
speaking of Wavre, I personally believe that Jeannin and Roussel would have
been better positioned one hex back at J24, and that the Imp. Gd. Hrs. Arty
should have stopped in J23. These units, when operating by themselves, are
both relatively weak and extremely "brittle" when it comes their
performance on the battlefield: the previous combat results in this sector
notwithstanding, a single exchange –
assuming that there are no additional
units to absorb losses –
would severely reduce the usefulness of this
contingent when operating as an independent force; moreover, deploying these
units to their alternate hexes would allow the cavalry reinforcements to
close up –
if that is the French player's intention –
to within one bound
of these units' new positions; and last ,but not least, by positioning in
these alternate hexes, all three of these units would be able to reach all
of the Dyle River hexes from J26 to N24.
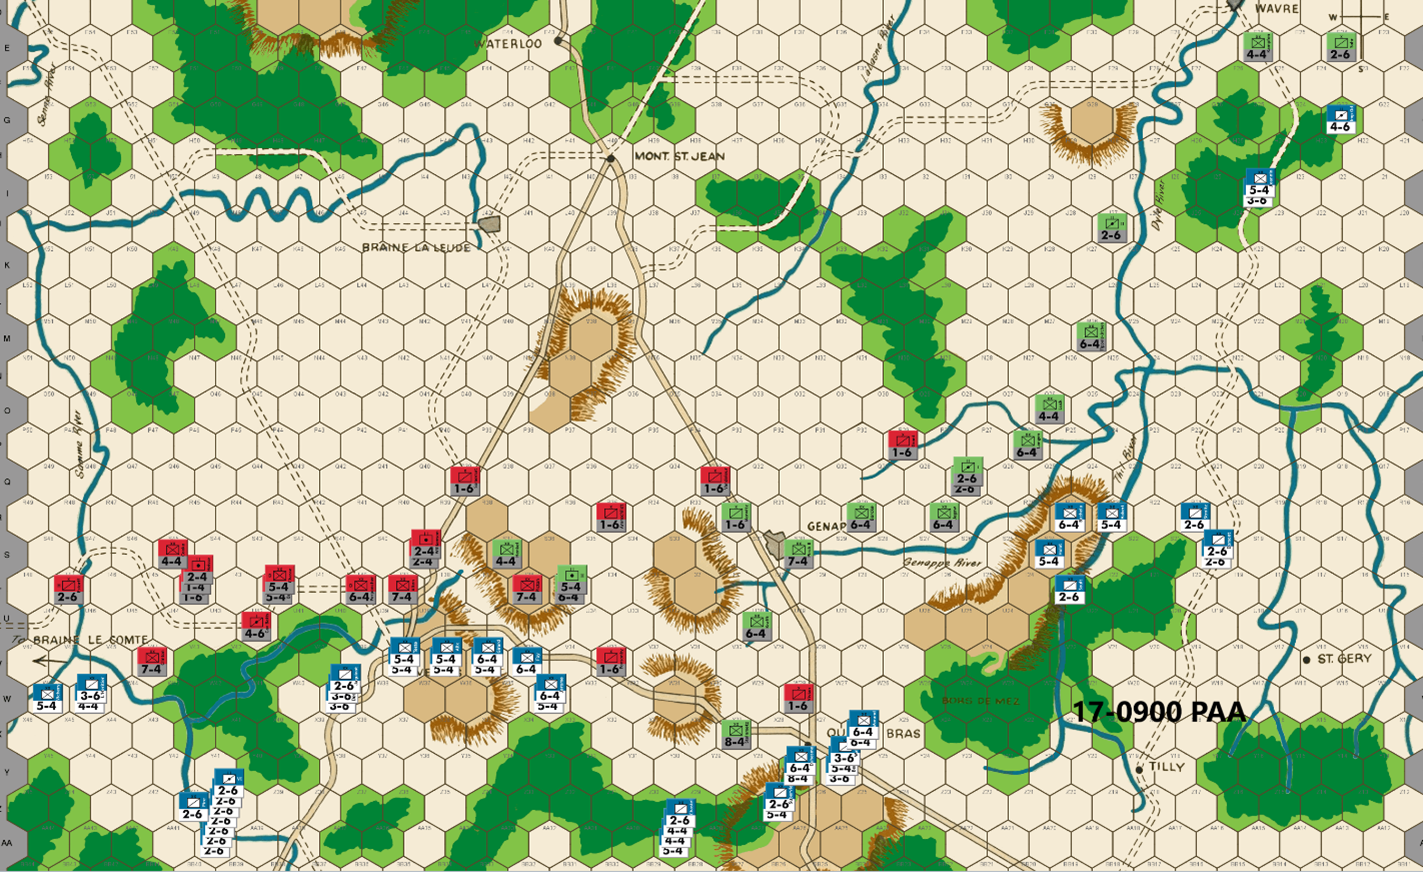
Ed: In the west, I am no longer that concerned about holding the western side of the Samme River. Any French there will be vulnerable to surround attacks because of the board edge. Estorf moves so as to block the 5-4 infantry perched on the river. I don’t think Bert will want to risk a 2-1 attack as AB is AE and an exchange is favorable to the Allied cause. I anticipate he will cross the river, however, to lengthen the Allied defensive perimeter. Clinton 3-1 proofs V44 while other units move east toward Nivelles where the real action will start soon.
The French can get a 3-1 vs T39, but it will cost them soak offs and potentially a doubled exchange. It is also into the teeth of the Anglo-Allies strength. I don’t think Bert will risk it. Picton 3-1 proofs the very valuable T36 hex.
On the central front, Bert only has 7 factors at Z27. That means Steinmetz at X29 is 3-1 proof and blocks a westward move. Bert can take a low odds attack but any Y28 will be eliminated if it is an attacker retreat. I doubt Bert will want to take the risk. This allows me to 3-1 proof the rest of the central front with a blocker at W28.
Bert surprises me – nothing new here – by splitting his eastern forces. Some reverse march to aid in the Genappe River advance while three units head north to keep my Prussians busy. In the Tilly Corridor, I block the small French contingent with 3-1 proof positions. I give up on trying to guess his intentions and will simply deal with what I see.
Joe: In the West (Nivelles and the Braine le Comte Road):
On the whole, I am generally impressed with the overall PAA move on this
front: it is generally robust, flexible and well-balanced. I like the
fact, for instance, that the French nuisance raid against W46 has been
economically blocked by Estroff at T47, and that Clinton's detour to V45,
eliminates the possibility (slim as it was) of a 3-1 versus this hex. I do
have one "nit" about this move, however: I personally think –
granted,
this comes out of an abundance of caution –
that it would have been
prudent to leave one of the two 5-4s at T46, just in case. Looking farther
east, the rest of the Allied line looks quite solid, and also looks both
awkward and expensive for the French to attack. T39 remains vulnerable but
is, nonetheless, about as strong as can reasonably be expected with a
single 7-4 defending it. And looking a little farther to the east, the
"problem" hex, T36, is happily 3-1 proof –
at least for this turn –
so
opportunities for French mischief against this position have been
temporarily stifled. Of course, positioning Steinmetz (who was within
range) would have been a lot more economical, but that change would also
have required the expenditure of three, rather than two sacrifice/delay
units this turn, so there is that.
[On the subject of Steinmetz: I admit that positioning this powerful
unit at X29 garnered a 9 out of 10 on the "cuteness" scale (I know
because I've done it myself); however, I also worry that this move is a
5 out of 10 on the "danger" scale and, considering this French player's
willingness to risk a lot more to accomplish less (e.g., the Thil
River attack), this move seems risky, in the extreme.]
In the Center: In view of the fact that Prussian units totaling twenty-three combat factors are presently shoring up the Anglo-Allies in the west and preserving a 1-6 delay unit by blocking in the center, this move accomplishes about as much as could reasonably be expected. Needless to say, the Genappe line will come under serious pressure on the 1100 game turn, and those twenty-three Prussian combat factors are soon going to be desperately needed on the Prussian side of the Nivelles-Genappe line, but, for time being, the Prussian center is holding without them.
In the East: Being, by nature, a "worry wort," I confess that, at
present, I am considerably more concerned about this front than I am about
the west or center. While I may be wrong, I don't think that I would have
chosen this momment to shift Langen and Luck west towards the Genappe line.
On the contrary, I personally think that it would probably have been a bit
more prudent to have left Langen at O26, Tippelskirchen at M26, and Luck at
J27, at least until the French player's plans for his three fast approaching
cavalry units have been revealed. The other major "nit" that I have
concerns the Prussian block at E24: because of the possibility of Roussel
switching east to reinforce the Imp. Gd. Hrs. Arty, I would definitely have
positioned both Sohr and the II Corps Hrs. Arty at E24. Granted, a French
3-1 against Sohr is an attack that I probably wouldn't make –
especially
with reinforcements on the way –
but, then again, this is the very same
French commander who did not flinch at the thought of exchanging a 5-4 for
an Allied 2-6 earlier in this game.
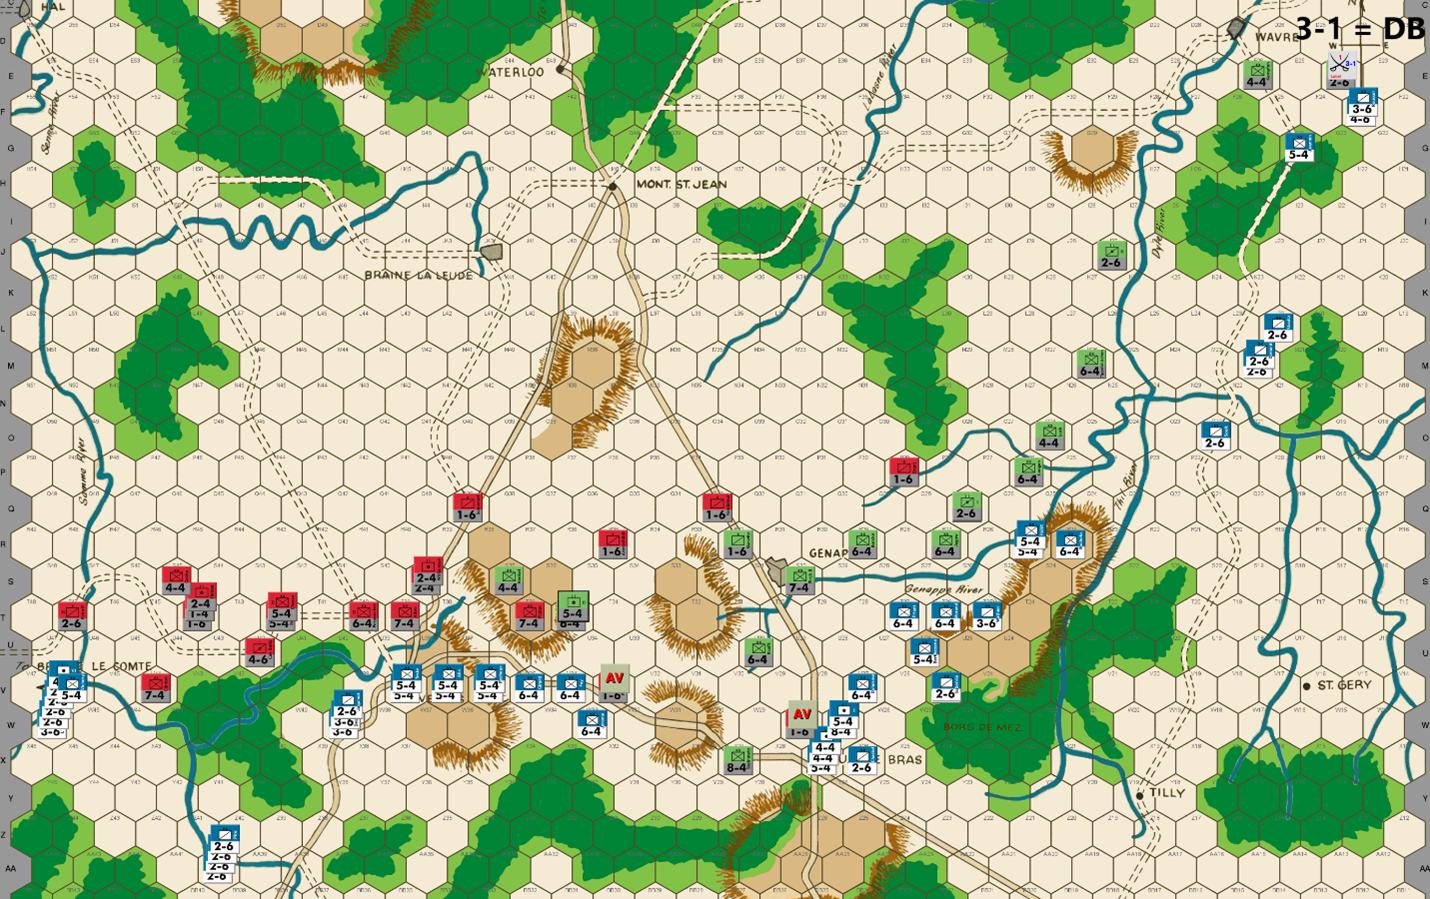
Bert: As we approach the middle of day 2 of this campaign and I assess the board position, I have to be pleased. My strategy was to stretch out the PAA across the board and the French army is literally conducting operations from the far western edge of the board, where a contingent of forces have breached the Samme River to the far eastern edge of the board, where some wayward troops (they were supposed to be just a feint!) are conducting an attack near Wavre. In the center, I am breaching the eastern portion of the Genappe River (whether or not this succeeds will depend on Ed’s appetite to counterattack) and I’m about to push the PAA back to the row T defense line. My center forces should be hooking up with one another by next turn.
Despite that long French line, Ed was able to adeptly position his units to expose only two units to AV attacks this turn. I’ll settle for them along with my 3-1 attack near Wavre. Regarding that attack, since I love to attrit the PAA units and because my army has minimal losses to date, I am OK with risking an exchange of a valuable 3-6 piece for one of his Prussian 2-6s. This is especially worth it, in my opinion, where Ed’s position is strung out so much that losing a piece will make his defensive position even more precarious. Of course, there is also the 40% chance that the dice will deliver me a clean D Elim result on that attack.
I’ve dispatched some more cavalry to the direction of Wavre. As usual, their mobility could allow me to redirect them as needed. As the French player, I like to have my mobile pieces on the move to project my forces in a threatening manner as opposed to just sitting stacked behind the heavies, waiting to be deployed one at a time as sacrificial soak offs.
I have two interesting points that I want to share that I considered for this move. First, my stack of units that started this turn in the woods at AA29. I was going to move some of those units northward through the woods, mainly to continue to threaten W31 as a viable defensive position. Since my Nivelles forces are closing in on that hill from the west, I realized that I’d have more flexibility to have those units threaten the W31 area and the Genappe River if I marched them around the woods to Quatre Bras instead. ‘Hexes matter’ is one of my mantras when playing the AH classic games and this was a case of that in action. Those units look much more useful to me by being on the road junction so that they can aid whichever direction I need them to on the next turn instead of them being slogging through the woods at Z30.
The second point is how I deployed my units to attempt to breach the eastern portion of the Genappe River. I decided it was best to have two units on the river line instead of just one since, if they both survive Ed’s turn, they will give me the option to have one unit soak off while the other unit can break a potentially doubled river defensive position, should that opportunity arise. Of course, it is not wise to be using a heavy infantry unit to soak off on a regular basis, but having ‘the option’, is better than not having it. In addition, I pondered where to position the adjacent 6-4 infantry unit. Since Ed could counterattack my units on the river from three hexes, the 6-4 unit could only force one of those hexes to cost him a soak off. Since I stacked two defenders in the same hex, any 3-1 or greater attack would require a soak off against the other defender, but it would also force Ed to attack from at least two of the three hexes adjacent to my stack. By putting my 6-4 at R24 instead of S25, I am making sure that Ed can’t use Marwitz to soak against both the extra 5-4 and the 6-4 in the same attack. Of course, Ed could just attack from Q26 and R26, but that brings whatever units end up stacked at R26, closer to a significant number of my units. Finally, just in case, my 6-4 (Bachelu) could easily move to N24 on my next turn and add to my Tilly/Wavre contingent of units. I expect Ed to fall back and not counterattack me there, but I can’t be sure of that of course.
Finally, today is the first day that I got to read the latest of Joe’s awesome commentary on our game. I want to note that I didn’t intentionally become passive on the 16-1500 turn. I did what most of us do – I made a mistake or had a blind eye to the situation in front of me! Frankly, I didn’t see the opportunity for the 3-1 attack versus Picton on that turn. Joe is absolutely correct that missing the opportunity of a 70% chance to take out one of the key pieces was a big mistake by me, especially with me looking to cause the PAA side attrition every chance that I get. It would have been well worth the two soak-off units. So, while I hope that everyone reading this is taking something away from our endeavor that will improve their play and enjoyment of this classic; I can assure you that as a participant in the game, I too am learning. I hope to not miss an opportunity like that again!
Joe: Well, it looks like we're finally getting to "crunch"
time on the Nivelles-Genappe Line. That said, this next turn should
finally see the French take complete control of the east-west primary road;
and after that –
given Bert's avowed distaste for doubled exchanges –
we
could either see a continuation of the current methodical grind forward,
or, alternatively, we could also see a sudden switch to "Katy bar the door"
time!
THE FRENCH:
In the West (Nivelles and the Braine le Comte Road): In spite of the fact
that the Left Wing of L'Armee du Nord has –
thus far, at least –
suffered
literally all of the combat losses sustained by the French Army (fourteen
factors at this point in the game), it has, nonetheless, continued to push
forward relentlessly against the PAA right, while also applying offensive
pressure against the entire length of the enemy line from the Braine le
Comte Road to the T36 hillock east of Nivelles. This French force has
succeeded thus far, because it has continually probed for weaknesses in the
Allied position, and when a weakness has been found, it has quickly been
exploited. Moreover, the positive fruits of this French strategy can already
be seen in its opportunistic expansion of the Samme River bridgehead at W46
into V46; in the credible offensive threats radiated by the French cavalry
stacks at W46, AA40 and W39; and even in the seemingly unstoppable
hex-by-hex eastward march of the Left Wing's infantry along the
Nivelle-Quatre Bras Road, at a time when the threat of an Allied attack
should be increasingly plausible. All of these elements yield strategic
benefits that, when taken together, a) limit Allied movement options, b)
pin PAA units in place, and c) hamstring the ability of the Allied player
to act offensively. And it is these outcomes, not the odd battlefield
success that –
in my view, at least –
actually contribute to a player's
operational mastery in the long term! Now, having said all that, the
actual point of this brief rant is to emphasize two basic truths
underpinning French operations in the west: the first is that, if the
initial contingent dispatched to fight on this front is large enough (both
numerically and in combat power), then local combat losses –
assuming that
they are not truly excessive –
should not significantly degrade the
offensive power of the surviving units assigned to this battle space; the
second is that ongoing offensive operations by the French in this sector,
should rarely depend on low-odds gambles, or on daring maneuvers or gambits
as a necessary prerequisite for their overall success. In this particular
game, for example, the French commander has only resorted to a couple of
carefully considered positional gambles and, not surprisingly, has been
treated to both favorable and unfavorable outcomes as a result; on the
other hand, the one and only French low-odds attack that was attempted on
this front, failed spectacularly. All this, by the way, is not to suggest
that the French player should never take chances, but only that his risk
taking should be both sparing and carefully thought out. Remember, while
there is nothing wrong with a player being prudent; it is also that being a
player who consistently eschews risk-taking is predictable, and
predictability is exploitable. Now looking ahead to next turn, I expect
that the key question for the French player will be whether to attack the
units at T36 (T39 is out of the question because of the stacked 7-4s and
also because of the soak-offs required), or whether he will wait another
turn. If he attacks next turn (which is a weak maybe, in my opinion), then
it is unlikely that he will try for any combination of attacks (1-1 or
1-2/3-1) that might yield an advance: this is because, to safely advance,
he needs to be able to strongly occupy both T35 and T36 orT37 and T36 at
the end of combat, otherwise either his flank units or his advanced units
would be vulnerable to a surrounded counterattack. That said, waiting
another turn might be the better move, if only because T32 (if not occupied
by Steinmetz) might open up to a 3-1 attack. In any case, we'll know soon
enough. Last but not least, I have only one minor "nit" to pick, when it
comes to this French move: I think that the effectiveness of the cavalry
threat would be modestly increased if the two 3-6s at VV39 were swapped for
two of the 2-6s at AA40. Other than that single tweak, I wouldn't change a
thing.
In the Center: The general outlines of this turn's French operations in
the center are –
except for one glaring surprise –
pretty much "textbook"
WATERLOO play. For starters, the Allied sacrifice/delay unit at W28 is
eliminated, while those French units that are able, close up to the Allied
defensive line farther north. South of the Heights, the French stack at
AA29 –
suddenly finding itself without a job –
counter-marches east to
regain the north-south Gosselies-Quatre Bras primary road, and then
continues north to rejoin other friendly units in-and-around the now
French-occupied town of Quatre Bras. On the eastern side of this battle
space, the contingent recently detached from the Tilly expedition –
begins
a push against an undefended section of the Genappe River –
by
establishing a bridgehead at R25 with two 5-4 infantry units. Now, putting
all that aside, its time to discuss something completely different: the
one player decision that was truly surprising about this French move
–
the
thing that left me initially gobsmacked –
and it was not, interestingly
enough, something that the French commander did, but rather, it was
something that he did not do. In a nutshell, the same French player who
previously had not flinched at the thought of attacking a doubled Prussian
6-4 at 2-1, suddenly seems to have become uncharacteristically cautious and
risk-averse; and even though he controlled several stacks of French units
that all began their move in a position from which they could move to
attack –
at either 1-1 or 2-1 –
an exposed Steinmetz at X29, he
studiously declined the opportunity, and instead moved the potential
attackers away, completely bypassing the Prussian 8-4's position. So, if I
have any serious "nits" to pick with this move, this is it. Not only did
the French player have enough units in position to safely make a reasonable
low-odds attack, but they were also even the "right" units with which to do
so, as one of them was the French 8-4. And surely, if the Imp. Gd. Foot
Arty actually has a divinely-ordained purpose in this game, it has to be as
the trade in an equal factor exchange against a basic strength Steinmetz.
Admittedly, an A Elim on a 1-1 or 2-1 attack (at a cost of either eight or
sixteen factors) would have been painful; however, neither adverse outcome
would have been fatal; and for that reason, I think that some type of
low-odds attack should have been made.
[A quick note on player psychology: On the one hand, this sudden
Gallic restraint has to be a relief to the Allied commander; on the
other hand, since it is unlikely that this particular adversary has
suddenly become timid, it suggests something else: that this French
player may have decided that he has now accrued enough of a strategic
advantage that he can afford to dial back his risk-taking, at least for
the time being. And even when a player disagrees with his opponent;s
assessment of the game, it is nevertheless useful –
at least in my
opinion –
to have a sense as to just how his opponent views his
situation as the game progresses.]
Finally, there is only one other change that I would have been tempted to
make (and that only if Steinmetz had not been attacked) which would have
been to post the Imp. Gd. Foot Arty, along with a single 2-6, at Z27; and
that's only because I dislike surprises.
In the East (the Tilly Corridor and the Road to Wavre): The situation in the east just gets better and better for the French. Granted, the recent 3-1 attack versus Sohr only yielded a DB2, but the PAA defense of Wavre and the Dyle River Bridges is problematic because the Allies have a "numbers" problem: the PAA only have two units (for a total of six factors) presently in the Wavre battle area, and have only one unit, the 2-6 at J27, that would be able to reach the Wavre area in a single move; this should help shore up this position for one more turn, but after that, this sector will probably to be abandoned in order to conserve units. Moreover, help is probably not on the way as any additional Allied reinforcements would require three or more turns to reach their brethren already present on the eastern Dyle. In the case of the French, they start out with both a numerical edge, and an advantage in combat power (three units totaling twelve factors); but wait, it gets better: four 2-6 cavalry are only two moves away from the Wavre front, and when they arrive, the Allied defense will be swamped. Moreover, with a force of seven units, now totaling twenty factors, these eastern French units will now be able to attack a basic 4-4 or a doubled 2-6 at 5-1, and an exposed 6-4 at 3-1. What happens after the Dyle is breached will really depend on how successful the PAA commander is in extricating his surviving units: one goal of the Allied player will definitely be to try to get a unit across the eastern La Lasne River and into A34, one way or another; however, because of the combat power and mobility of the French contingent on the Wavre front, the PAA commander will also have to worry about the possibility of a French pivot away from the La Lasne River and the narrow forest gap at Rosieres, and towards a battle in the west, with the ultimate goal of either making a dash for the La Lasne River ford at H34 or, alternatively, of chasing up whatever is still remaining of the Allied Dyle defense line.
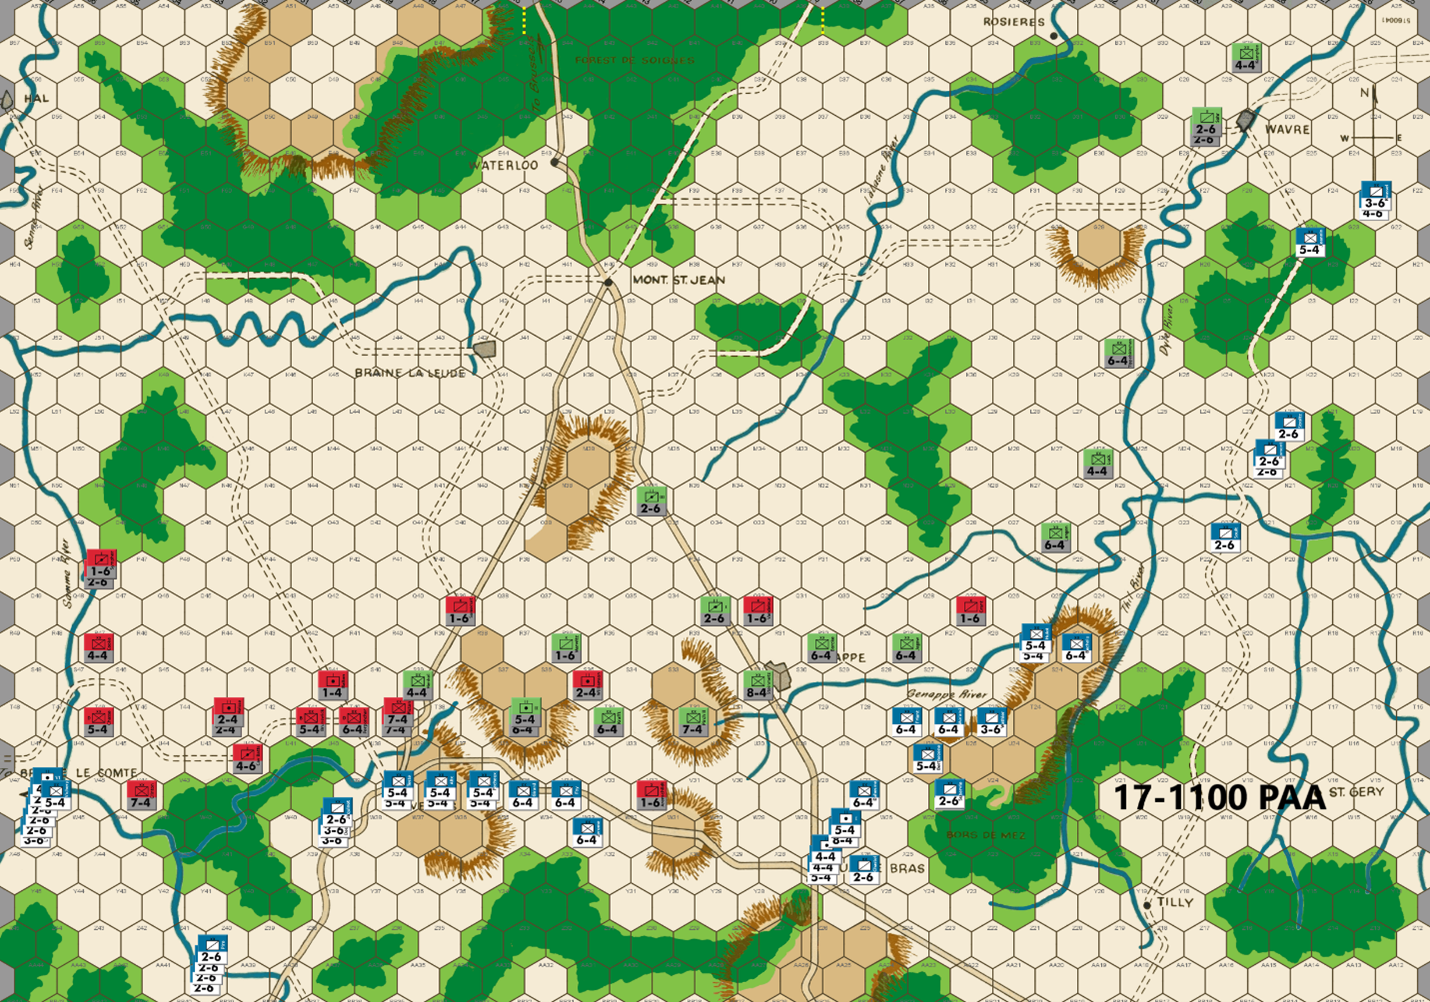
Ed: In the west as I mentioned previously, the French are vulnerable if they do advance on the western side of the Samme River. I defend along the eastern side of the river. I station two cavalry units astride the river able to undouble the defense of the leading edge of any such advance. Cooke (4-4) defends at R47. Cav Batts (4-6) is at U42, where he can join in on an attack across the Samme River if needed. If the units were reversed, Cooke would not be within range.
At Nivelles, I place two 7-4s at T39 to prevent any advance after combat barring a low odds attack success. I stationed double infantry at T36 for the same reason. Unfortunately, I don’t have a pair of 6-4s, so one is a 5-4. Bert can 3-1 the 5-4 from two hexes and soak off from T37 so I don’t have a surround counterattack. He could also attack from three hexes at 4-1 with a soak off. That would give me a surround attack on his units at T37. I don’t think he will want to do that. And lastly, he could attack at 1-2 and a 3-1 attempting to advance into the hex after combat. This last attack if successful would be damaging and very well be Bert’s choice. But this is the best I can muster and will simply have to await the French choice.
In the center, I use a blocker and otherwise defend behind the Genappe River. I don’t expect an attack here on my doubled defenders.
In the northeast, I made a blunder on the last turn allowing the 3-1 attack on Sohr near Wavre. I have no idea why I didn’t see that attack possibility, but I didn’t. Fortunately, the DB result saved Sohr and allows me to defend as I had planned. I am able to 3-1 proof the river except A26 and B26. His cavalry can and likely will move onto the river at B26. With more cavalry on the way from the south, I cannot hold this river line. My 4-4 infantry will withdraw to B32 astride the LaLasane River where it is 3-1 proof before withdrawing behind the river. My two cavalries along with the infantry in the south will begin their withdrawal to the LaLasane River. This and the threat of the Prussian Fourth Corps entering the game on the 18 th in the French rear should keep any French out of Brussels. Bert has surprised me enough that I won’t try to guess what he will do. I’ll try to be prepared for any action he decides on.
Joe: In the West (Nivelles and the Braine le Comte Road):
The Allied player does some serious unit shuffling and manages –
thanks
to a bit of help from Blucher's Prussians –
to organize a reasonably
formidable defense line that stretches all the way from the Samme River to
the hillock at T36. Starting in the far west, the Allied situation in this
area is a little complicated, so it is probably not surprising that the PAA
player decides –
with an abundance of caution –
that stringing units
along the eastern bank of an exposed section of the Samme is a sensible
response to the threat posed by the (twenty factor) mob of French infantry
and cavalry clustered at V46 and W47; moreover, he also decides that
–
given the French investment in combat power –
this precaution is probably
reasonably economical in terms of units committed to this task. As a nice
welcoming touch, two Allied cavalry units are positioned to straddle the
river just out range of the foe's cavalry at P48; this way, if the French
player actually does take leave of his senses and decides to raid north
along the west bank of the Samme River, there will be a couple of PAA units
already across the river that will be able to support friendly attackers by
cancelling the cross-river defensive multiplier for any French units in the
neighborhood. However, as exciting as the idea of a French raid towards Hal
may be, the more likely development will probably be his partial or total
abandonment of the bridgehead at W46 and V46; because whatever else
happens, these French raiders are going to be needed elsewhere, and
probably sooner, rather than later. That said, and as interesting as this
far western sideshow has been so far, the real action is only a turn or two
away, and that is almost certainly going to take place somewhere in the gap
between the Samme and Genappe Rivers. The good news for the Allies, both in
this sector and in the center, is that none of the PAA "heavies" have been
eliminated: the presence of all four 7-4s and the 8-4 really make
organizing a defense a lot easier during this critical phase of the game.
And on while we're on the topic of the Allied defense: as I noted
earlier, the most obvious and, in fact, the only realistic candidate for an
early French attack is probably the the two-unit Prussian stack on T36, and
even this objective seems iffy as an early target. Of course, whatever else
happens, the block at V32 will be eliminated next turn, and that will clear
the way for the French to then add T32 and T34 to their list of potential
targets, to go along with T36.
In the Center: Here the Allies get a modest breather as Blucher's line of
Prussians –
stretching from S34 to R28 are all 3-1 proof. Unfortunately,
the unlucky destruction of Division Stulpnagel on the Thil has exposed the
eastern section of the Genappe line to French attack at least two turns
earlier than usual. The sacrifice/delay unit at Q27 temporarily protects
the flank of Division Jagow, but it is an absolute certainty that the
French will be across the Genappe, in strength, next turn, and that will
allow the French player to put O30 and P30 under the same kind of pressure
as the rapidly crumbling Genappe line. In addition, Langen, Luck and
Tippelskirchen are all soon going to have to abandon their positions on the
Dyle River and fall back, almost certainly towards the La Lasne line.
Besides the slow collapse of the Dyle and Genappe River defenses, there is
one other aspect of the Prussian situation in the center that is worrisome,
and that is the strong possibility that one or both of the Prussian 2-6s
presently parked on the Quatre Bras- Mont. Ste. Jean Road, may have to
abandon the center in order to dash east to help defend the La Lasne River
against marauding French cavalry from Wavre. Such a move is not as trivial
as it looks because these units typically play a crucial role (mainly as
soak-offs) when it comes to any Prussian battles in the center.
In the East (Wavre and the Dyle River Bridges): What can I say? The PAA player only really has a couple of options in this sector, and neither offers more than a temporary fix. That said, the option chosen on this front is probably the best one available, as it discourages an immediate French assault since both the cavalry stack at D28 and Kampfen are safe from 3-1 attacks for one more turn. Unfortunately, next turn, Kampfen is probably going to have to retreat to B32 so that he can then move, on the following turn, through Rosieres to A34. The goal of this move is to (hopefully) close the "back door" path to the eastern Brussels Road exit hex. To accomplish this, however, will probably require the sacrifice of a 2-6 at B29 in order to prevent Kampfen from having to dodge at least one low-odds French attack before he can make his escape. Good times, if you're the French!
Bert: My 3-1 attack near Wavre was not rewarded with a good
result, so Ed is able to have another turn of a credible defense to hold the
river line. While I have a unit successfully breaching the river at B26, my
additional units arriving on the scene will hopefully be enough to stretch
out his defense that he can’t effectively cover the line. The clock is
ticking on this foray, because the arrival of significant Prussian
reinforcements to my east are a few turns away. If I haven’t cleaned up my
position in this sector prior to their arrival, they might easily trap and
dispose of any of my French units that survive the coming turns. I have to
stay aware of this threat for the next few turns. To increase the pressure
on his defense of the Dyle River, I shifted another heavy and a cavalry unit
to the N24 switch hex.
In the center of the board, I have finally forced Ed to retreat back to the
T row, once I eliminate his last blocking unit this turn. In theory, this
has allowed the French units to sync up the Quatre Bras forces with the
Nivelles forces. I say, “in theory”, because while there is indeed a minor
sync up of forces, I have intentionally committed a significant part of the
Quatre Bras forces to attack across and breach the eastern portion of the
Genappe River. The number of units committed to here are necessary to quell
any ideas of Ed trying to counterattack me as would be the case, if I didn’t
put those units in that position. It will make coordination with any
Nivelles units impossible for the time being. In addition to dissuading a
counterattack, my units are in a position to add pressure northward if I
choose to go all out to try and drive Ed back to the La Lasne
River as
quickly as I can. That strategic commitment can often lead to the collapse
of the PAA’s center, as they will need additional units racing back to cover
that last line of doubled defensive positions before the exit hexes.
I don’t have much appetite for fighting through the city and adjacent hill
and river hexes of Genappe, so my approach will be a slow one from the east,
as Ed is likely to continue to offer up blocking units that I’ll have to
fight through. I decided to advance the 5-factor infantry unit into Q27
following the AV for multiple reasons, despite it being an easier
counterattack target:
· I don’t think he can get a 5-1 attack, so an exchange result would cost
him a 6-factor unit or multiple units if he does attack – I don’t think he
will.
· Q28 can’t be used for a sacrificial unit on his next move.
· I block the path for him to send a unit(s) through hex P28, preventing any
further shuffling between the center units and the Dyle River defense
contingent unless they attack first or come through J34 or Mount St. Jean.
That path will be too late to hold the line along the length of that river.
Regarding the T36 hilltop, I do have an appetite for a little fight, as the
PAA position has allowed me to take a 3-1 attack without exposing any of my
attacking units to a surrounded response since I don’t need any of my main
attacking units to be in T37. The attack seems well worth the expected loss
of my 1-6 soak off unit. Of course, I would certainly like to avoid the
exchange against the doubled defender, but if that is the outcome, it’s the
cost of doing business to force the action to break his defense line of
doubled hexes.
It won’t be a surprise to see Ed counterattack me in attempt to keep control
of the T36 hill awhile longer. My calculus is that this resulting battle
favors my side since he would need to expose units on T35, T37 or both,
which are undoubled positions. Plus, a counterattack will likely cost him a
soak off unit. I debated putting some unit(s) in hex U37 to limit his
counterattacking, but I decided it was best to leave that hex empty, since
if he moves into it, his unit(s) will be surrounded on my ensuing attack.
Also, I see if I put something like two 6-factor infantry units in U37, Ed
can easily get 36 factors against me for a big 3-1 attack. I’m not ready to
expose my units to that important of an attack.
Finally, I’ve decided that Ed’s continued deployment of strong units to protect the Braine Le Comte area is too much in his favor for me to push any forces into the risky hexes west of the Samme River. I’ll likely need those forces for the battle going on east of Nivelles. In an effort to hopefully continue to tie up some small number of Ed’s defenders, I’ve left my 5-4 unit on the river line. He can get a 4-1 attack (not surround), which would draw at least four of his heavy units away from the main battle area for an extra turn or two. That would be well worth it to the French side, especially with the risk of an Exchange or DB2 result. Continuing to breach that river line gives me a chance to send some nuisance force back that way next turn, should Ed finally withdraw some units. As I’ve done in the east, I hope to eventually send some kind of force along that river to tie up PAA units defending the Hal area, so when the battle moves to Mount St Jean, Ed is still dealing with some French units on his right.
Joe: In the West (Nivelles and the Braine le Comte Road):
In view of the fact that the French bridgeheads at W46 and V46 have provoked
about as much of a tactical response from the Allies as they are ever likely
to, and with the opening round of a major battle about to begin near
Nivelles, Napoleon orders all but one of his bridgehead units to march
northwest to the sound of the guns. The Samme adventure is now essentially
over; now, the real "trial by fire" for the newly-minted L'Armee du Nord is
about to begin. That said, I personally think that, except for a couple of
cavalry units left behind at AA40 just to keep the Samme under observation,
I would have ordered everyone else to immediately start marching toward that
little corner of Belgium that has only just now become the Emperor's choice
for today's battlefield.
[This critique doesn't actually rise to the level of a "nit," but is
more of a matter of personal style.]
And speaking of battlefields: Around Nivelles, there is only one question
that requires an answer: Will Napoleon attack the Prussians on T36 this
turn, or will he wait? Interestingly, the answer comes back sooner than
expected: he attacks, but does not attempt to dislodge both defenders,
choosing only to attack the 5-4, while soaking-off against the 6-4. As
frontal attacks go, this is about as meticulously-planned as it gets.
Unfortunately, the "Dice Gods" were not kind to the Emperor, and he loses
both his 2-6 soak-off and two of his six attacking 5-4s in an exchange (a
24% chance). In my previous comments, I had raised the possibility of a
hasty-assault against T36, once the Nivelles-Quatre Bras Road fell into
French hands, but was halfway convinced that, even if initially successful,
the timing of such an attack would be premature.
[So much for my powers of prediction!]
My skepticism –
putting aside the actual outcome of this specific battle –
did not pertain to the French player's choice of target, but only to his
choice of timing. My worry was that, until L'Armee du Nord was able to open
a path to T35 by capturing T34, any battle for the hilltop itself could well
degenerate into a cardboard replay of the protracted and bloody battle for
Hougomont in 1815. More to the point, since the French advance –
at least
in my opinion –
was already ahead of schedule, both in the center and
against the Genappe line, the risk of getting tangled-up with a potential
tactical "tar baby" like T36 seemed unnecessary. Admittedly, attacking the
Allied center a turn or two early would certainly apply extra pressure
against a defense that was already stretched pretty thin, and any
counterattack that the Allied commander could be expected to mount, would
–
of necessity –
expose high value units of his own (in the open) to an
inevitable French riposte. Nonetheless, while I admire the the Emperor's
panache, I still think–
even if the initial combat results had all been
optimal for the French player –
that this attack should have been
postponed. In any case, I could always be wrong, but we will see soon
enough. And last, but not least, I will finish by noting that the rest of
the French player's move in this sector –
including that of most of the
cavalry –
seems perfectly reasonable.
In the Center: The Emporer's advance on this part of the front is literally
"firing on all cylinders!" Most of this move is really almost automatic for
the French commander Needless-to-say, the two PAA sacrifice/delay units (at
V32 and Q27) are dispatched without difficulty, and the majority of the
Nivelles-Quatre Bras Road –
excepting only U36 –
is cleared of Allied
units and their ZOCs. In addition, the Genappe line continues to be rolled
up like a carpet, from east to west. Next turn, the Prussians will have to
sacrifice at R28, and Hexes O29 and O30 will both start to come under
threat. Farther east, the mob of French infantry and cavalry clustered on or
across the Genappe River on the "R" and "Q" rows, now menace, in concert
with the stack straddling the Dyle, Genappe and Thil River confluence at
N24, Division Langen at O26 with a surrounded attack at 4-1 odds, if he
doesn't immediately start his slow retreat north towards the shelter of the
La Lasne River. On the whole, this an effective "pressurizing" effort and
the only "nit" that I consider to be worth mentioning is –
what I consider
to be a misuse of a powerful French unit –
the wasted placement of the Imp.
Gd. Foot Arty at U28. This unit needs to move to the center where it can be
used either as an advanced guard, or as a"toehold" unit against Allied
doubled positions. In truth, where it should go precisely is really an open
question, as several hexes will probably work. Speaking for myself,
however, I think that the best choice would be W31.
In the East (the Tilly Corridor and the Road to Wavre): The Battle for
Wavre is just about over; and once the Prussians retreat, and they will, the
French units in that area should, at least, threaten A34.
[The Allied player –
in my view –
will really have a difficult choice
when it comes to this operation: If he attempts to save both Kampfen
and the II Corps Hrs. Arty by retreating to B32 and A33, respectively,
then he will risk either two 1-1s (using the French 4-6 and the 3-6) or
a 1-2 versus both (using the 3-6 only at A32). The Allied problem, in
this instance, is that, in either case, Kampfen will be surrounded. So
the PAA player's dilemma is: Does he try to extricate both units, or
does he sacrifice the 2-6 to guarantee Kampfen' escape?]
Since the results of a French breakthrough at A33 would be so dire, it is
highly unlikely that the Allied player will allow a French crossing of the
La Lasne River at Rosieres, so once any Prussian survivors have slipped away
from the Wavre battle area, probably the best way for the Wavre-Tilly force
to continue to torment the PAA, will be for them to pry any Prussian
hold-outs away from the Dyle River, and to then chase them north to the La
Lasne River line. Whatever happens, this French contingent (probably about
twenty-six factors once reunited and reinforced) should work to pin as many
Prussian units as possible on the north bank of the La Lasne and away from
the fighting in the center, especially during this critical phase of the
game.
Ed: In the far west, Bert withdraws much of his strength threatening the Samme River. I respond accordingly, defending with the minimum 3-1 proof positions and moving units east toward the main battle front.
Bert attacked the T36 hilltop as I was sure he would. But there are two pieces of good news there. First, he did not try a 1-2 & 3-1 to take the hilltop as I feared he might. Second the result was an exchange against my doubled 5-4 and the loss of a soak-off unit. It is critical to hold ground, so we will counterattack. Bert has done a very good job of stretching the PAA out across the board. I can get my preferred 5-1 attack if I use every Anglo-Allied heavy within range. That is what I do and fortunately get the likely DE .
Brause is the only heavy available to defend T39. That separates him from the other Prussians, but I think that is the best option. A blocker at T34 protects against surround attacks on the two nearby hilltops. Henkel heads east to join the other Prussians. I plan to attack the French next turn to protect my defensive line, and I likely will need Henkel’s help. One worrisome thing to note is that I am running low on blocker units.
A little further to the east, I defend behind a hilltop and the Genappe River. A blocker at R28 protects the eastern flank. Last turn, I indicated I would be withdrawing from the Dyle River. I now realize that it would be a mistake. It would open up the southern branch of the Genappe River where the French could threaten my defense of the Genappe area . Fortunately, Bert did not occupy P24 which would have allowed him to undouble my defensive position. So, I 3-1 proof the river defenses, only withdrawing in the north near Wavre where the French could get a 3-1 attack. Bert can get a 1-2 vs Kampfen who will have no retreat. The Prussian II Corps HA is on the LaLasne River to defend at A34 if I lose Kampfen. And from the central front, the III Corps HA has moved north to assist in the defense of the secondary road to Brussels.
Joe: In the West (Nivelles and the Braine le Comte Road):
After a day and a half of "cat and mouse," the French player suddenly
decides to gamble and launches a surprise assault against the Prussian
defenders on T36. Fortunately for the PAA commander, the Samme adventure in
the far west has pretty much come to its predictable conclusion, so
badly-needed Allied units can at last begin to shift west to meet the crisis
just east of Nivelles. In terms of its outcome, Napoleon's opening attack
is bloodily repulsed; however, in spite of this reversal, the Allied
commander has no reason to celebrate, because to hold the hillock at T36, he
knows that he will have to accept a continuing battle –
should the Emperor
seek a major action –
under conditions that will be far less advantageous
than those of the initial French attack. That said, the PAA player really
has no choice but to counterattack; and that he does in fine form,
marshaling his "favorite" 5-1 attack against a single French 5-4 at a cost
of a single 1-6 soak-off. The battle lines have been drawn; events, going
forward, will now rest with Napoleon and his determination to continue the
fight.
In the Center: Although the PAA have been treated to at least a temporary
battlefield success near Nivelles, the rest of the Allied line does not fare
nearly so well. The sacrifice/delay units at both T34 and R28 are doomed,
and their destruction will set the stage for future high odds French attacks
across the entire central front; and this at precisely the time when the
supply of PAA sacrifice/delay units is about to run out. Granted,
Anglo-Allied reinforcements are at last on the march, but the road to Hal is
a full five turns away from the current front. What this means is that
–
no matter what happens over the next four or five game turns –
the PAA
player is going to simply have to make do with the army he now has until the
morning of the 18th.
In the East (the Tilly Corridor and the Road to Wavre): "Well, this is a
fine mess you've gotten us into Ollie." As expected, the battle for Wavre
and the Dyle Bridges is now over, and the Allies are in full flight.
Interestingly, the PAA player has decided to gamble by not posting the 2-6
as a rearguard in order to cover Kampfen's escape; we will soon see whether
it pays off, or not. Now, having made his bet, the key question for the PAA
in this sector is: Will the French pursue the Prussians attempting to escape
across the La Lasne River near Rosieres whatever the odds, or will they
instead wheel northwest in order to pry the Prussians away from the Dyle
line? They really can't do both, at least not at the same time. For my own
part, as the French commander, I would definitely attack Kampfen and the II
Corps Hrs. Arty, if only with the 3-6 from A32 (a 1-2 versus both, with a
surrounded attack against Kampfen.) On the other hand, this French
commander may be more interested in marching west to assist with the push
towards Mont. Ste. Jean; in any case, we will soon see.
[While I'm thinking about it, allow me to offer a brief explanatory note
(or excuse) as to why I tend to be wrong
so frequently about player intentions in this match: In a nutshell, in
an attempt to prevent future game developments and combat outcomes from
influencing my analysis, I review each player's move individually
–
opening and writing up the latest French game file, before I open up the
next PAA move –
and because of this approach, I am often surprised by
the actual turn-to-turn ebb and flow of the game as it develops on the
game map. This practice of mine doubtless explains my miserable record
when it comes to making specific predictions about future player
actions, but it does allow me to experience this game much as I would,
if I was watching it unfold in real time.]
Finally, as an interesting thought experiment for the Allied and French
players to both consider: How much differently would this front have played
out if the French player had committed an additional three cavalry units to
the Tilly campaign from the very beginning?
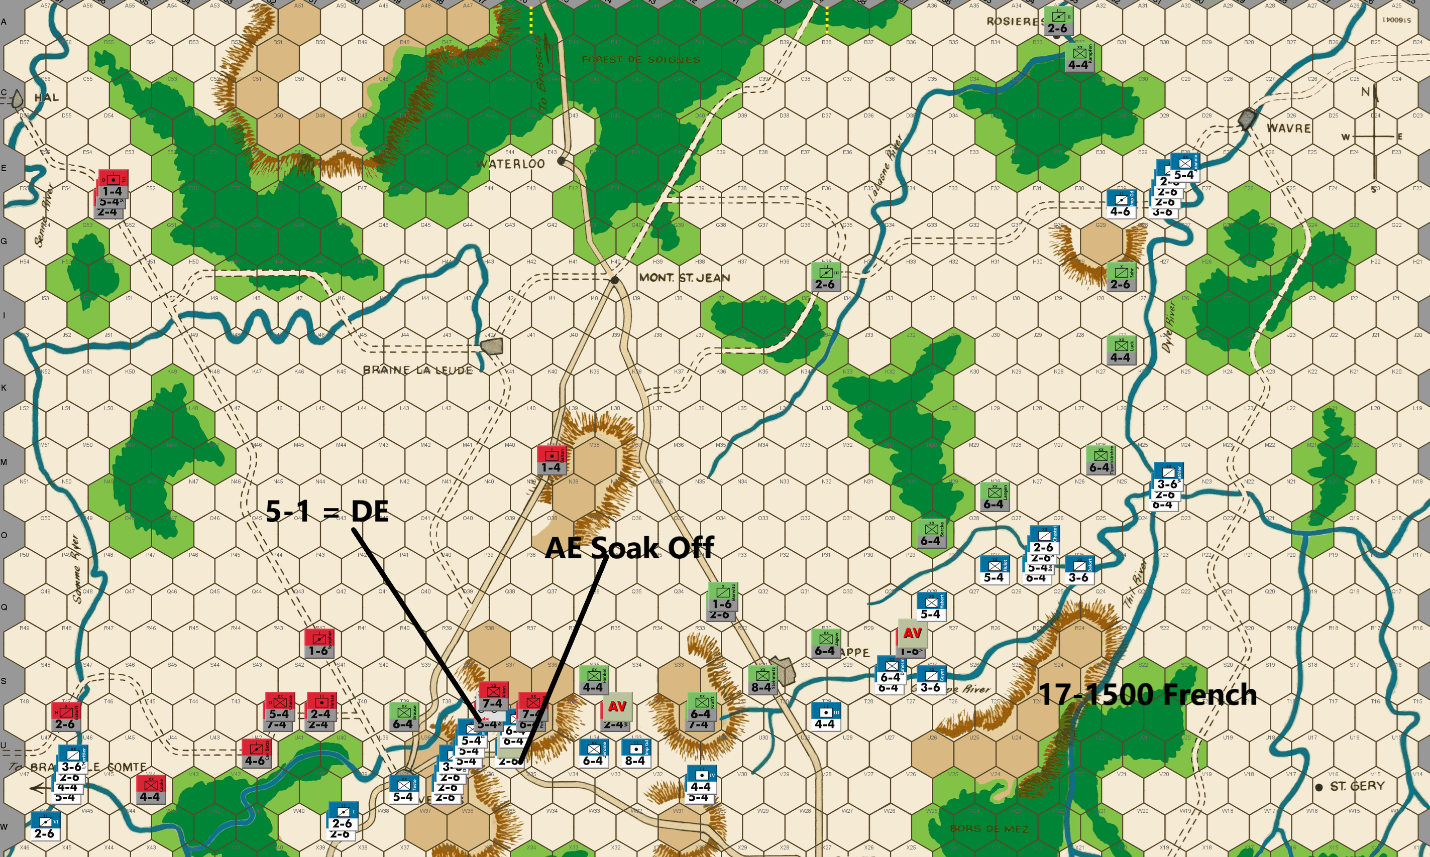
Bert: My 3-1 attack versus T36 last turn yielded an unfortunate (from the French’s perspective) exchange while Ed’s 5-1 attack secured a D Elim result, which added to my disappointing outcome so far on this exchange (pun intended!). As I noted last turn, it’s the cost of doing business but losing 17 factors to kill 6 so far is not a sustainable ratio for the French. At last, I finally got him to lose a PAA piece on a soak off initiated by him.
My follow-up 5-1 attack this turn intentionally leaves only 6-factor French units adjacent to hex T36. This is important because Ed can’t get 30 factors from either faction of his force to attack U36 and even if he could, that still wouldn’t be enough for Ed to get another 5-1 attack against that hex. As a result, at a minimum, Ed will need to risk an exchange result to make an attack from T36 again on his turn. That 30% chance has deterred Ed from doing so previously this game and so I can’t be certain that he won’t take it again. Hex U37 can be easily attacked by Ed with a 5-1 and a soak off, but that doesn’t hold the hilltop. My immediate goal is to kick Ed off that hilltop or make it expensive for him to continue to hold it. I’m guessing that if I fail to eliminate Brunswick on my 5-1 attack, Ed might be more encouraged to take that risk to hold T36 and if he loses that unit, my guess is the response will be to give up the hill, putting a blocking unit at S37 while continuing to hold the T37 river bend for another turn before an orderly withdrawal begins. Perhaps that is just wishful thinking on my part.
Elsewhere, I debated whether or not it is worth it to send troops back to the Braine Le Comte area for another go, especially with the unfavorable attrition so far in the center. The decision was it’s worth it, if by some chance it draws PAA troops back away from the main battle. I suspect that it won’t, and Ed will just set up blocking positions with minimal troops.
On the eastern side of the board, the French have captured the vacated Wavre. Further, they advanced beyond the Dyle River. The Prussians at Rosieres should not pose much of a threat, but I held my one heavy infantry unit to do rear guard work as opposed to the normal position in this game, where the cavalry is held in reserve behind the heavy infantry piece(s). Enough force remains within range of B32 in case Ed decides to remain in that hex. More importantly, the combined French units on the various northeastern rivers threaten an escape attempt by the three infantry units that were defending the Dyle River area. Ed will likely have to offer up another sacrificial unit to let them escape, but it is a tricky position that I think he is faced with on his coming move.
To assist with the above, I put hex O28 in my ZOC to block an easy exit to the southwest or reinforcements from that area joining in to support that sector. I think that Ed could easily get the two 6-4’s to escape by infiltrating through the woods on the M row. This would best be achieved by sacrificing Luck (the 4-4) to block my path from attacking them. If he tries to block the path with Sohr (the 2-6), then I can probably get a decent attack against both units. If he tries to have his 6-4’s escape through the northwest pathway, that could lead to a more difficult challenge, depending on how he does it. Ed has repeatedly gotten his units into good positions and out of trouble, so there is probably an obvious solution that I’m just not seeing. We’ll find out.
Finally, I’m taking the 2 AV’s that Ed offered while I slowly wait for him to run out of blocking hexes along the Genappe River. I’m pretty sure that there will be one more turn of me advancing at a glacial pace, but a breakthrough to drive him back towards Mt. St. Jean should follow that shortly.
Joe: In the West (NIvelles and the Braine le Comte Road): I really like the French move on this front. I confess that I was initially surprised by the size of the force returning to the Samme bridgeheads at V46 and W46, but, upon reflection, I have to admit that this kind of substantial commitment makes a lot of sense. Granted, the PAA commander could counter this threat, but with the Allied position in the center and on the Genappe both verging on collapse, virtually any PAA response that involved positioning infantry beyond one bound of the Nivelles-Mont. Ste. Jean primary road would be foolhardy in the extreme. No, the main problem facing the Allied player is not PAA combat power, per se, but the current paucity of sacrifice/delay units available with which to both screen his battle line, and to serve as soak-offs. That said, although I can definitely see how the Allies might be able to continue the fight in the center for another turn or two, I cannot conceive of a scenario in which they would be able to hold their positions around Nivelles, and at T36, T32 and Genappe through the balance of the 17th. [A possible additional bit of good news for the French: I strongly suspect that the days of the PAA player's favorite 5-1s are probably over, at least until the action moves back to Mont. Ste. Jean.] All in all, right now it looks like it's really good to be the French Emperor!
In the Center: Time is running out for the Allies on this line, as it
looks like the methodical dismantling by the French of the Genappe line, is
rapidly coming to a close. The PAA have one more delay position at Q30
(R30 is a problem because it undercuts the defense of S31), and after that,
it's either fight in the open, or retreat back towards Mont. Ste. Jean. In
my view, a standup fight with the French at this stage –
given the
disparity in combat power and unit count between the two opposing armies in
this area –
is just too dangerous an option for the PAA to risk. And if
that weren't bad enough for Allies all by itself, there's more bad news:
Napoleon also has substantial forces, including cavalry, positioned on river
hexes at N24,P25 and P26 ready to run down and attack the unlucky
Prussian units –
that up to now have been tasked with defending the west
bank of the Dyle –
before they can withdraw to the protection of the La
Lasne River to the north.
In the East: The French player –
given a choice between launching a hasty
attack against the retreating Kampfen and IInd Corps Hrs. Arty, or of
making a dash for the La Lasne River –
chooses the La Lasne. And why not?
With French reinforcements having recently arrived in the Wavre area, a
once small French expeditionary force which, a few turns ago, had totaled
only three units and twelve combat factors, has now doubled in number to
six units, and has grown to eighteen combat factors. With these added
units, and new-found combat strength, the French commander is now keen to
race the retreating Prussian infantry for the La Lasne River crossings; and
with the likely help of units from the center, he thinks that it is a race
he can win.
[For those readers who have attentively followed the progress of the
Tilly campaign in this match, two things should have become abundantly
clear: First, the Tilly front does not necessarily need to become a
strategic "sideshow," when compared to events taking place elsewhere on
the game map; and second, because of the small numbers of units
typically involved, and also because of the remoteness of the battle
area and the mix of different types of terrain encountered in this
sector, this campaign –
with its occasional sudden swings in fortune –
can oftentimes turn into a surprisingly enjoyable "game within a
game."]
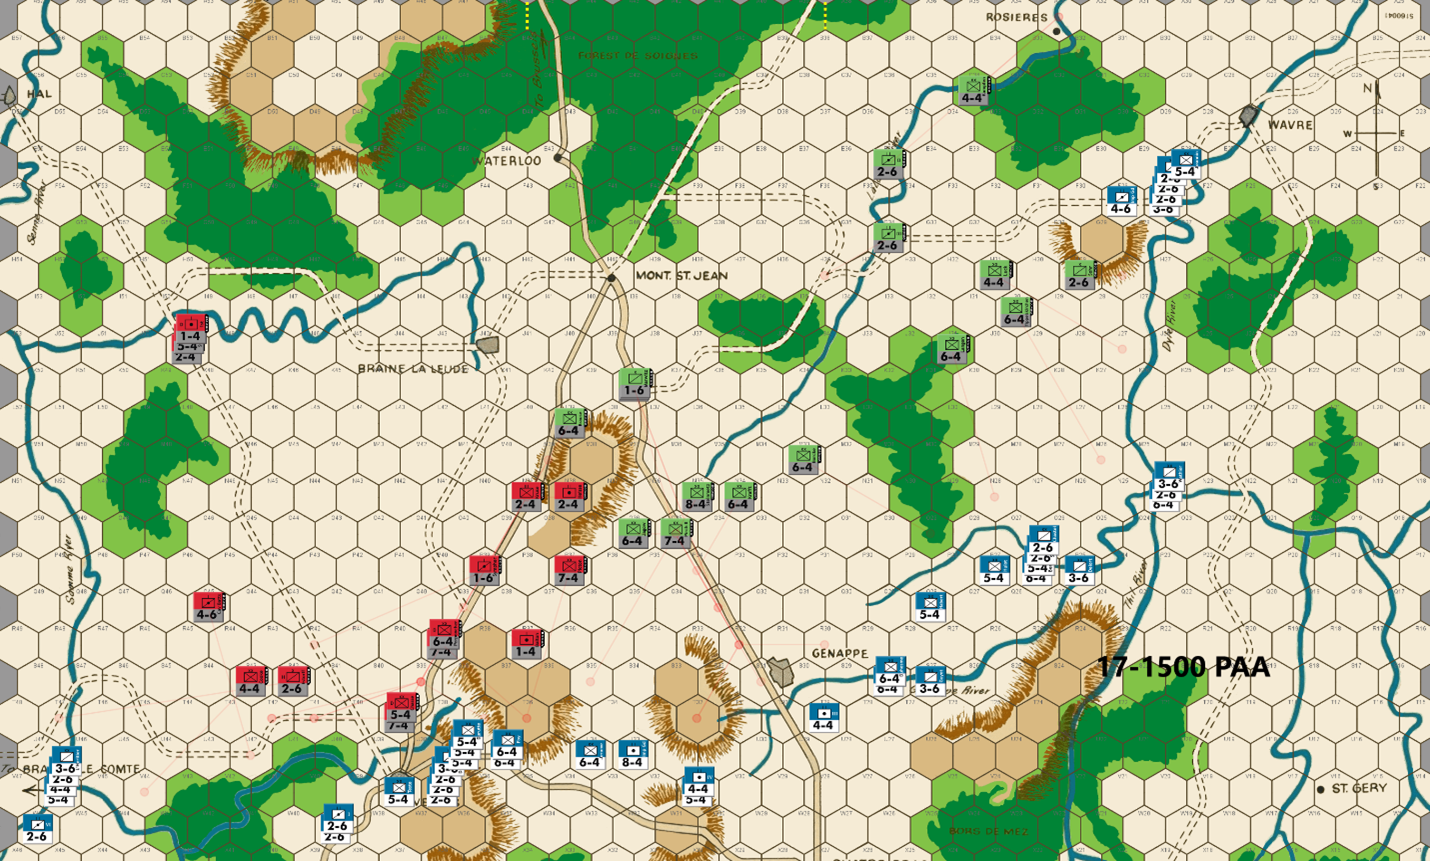
Ed: Now is probably a good time to discuss one of the metrics I use to assess how the game is going. If the PAA are able to hold the Nivelles-Genappe defensive line with modest casualties through the 17-1700 turn, the PAA is usually a favorite in my experience. Here the casualties are modest, but we have to withdraw a turn earlier than desired because of the threats all across the board. Contributing to the problems are the strong position the French have in the Wavre sector. In this game, I view the French as having the advantage.
I have three additional metrics that I like to watch. A second metric that Joe Beard taught me a few years ago is unit casualty count. The PAA get 78 units in the game and the French 50, for a difference of 28. If the PAA can maintain a loss differential of less than 28, they will have an advantage in the end game. Here the differential is 21, which is encouraging but a little early to celebrate.
There are two other metrics I use. Once the French get down to 25 or fewer units, they have a noticeably harder time mounting a set of attacks across the battle front. Here they have 41 on board – good news for the French.
In the far west my withdrawing units are out of range of French 3-1 attacks. I am able to hold the Nivelles River at T39 although that position can be attacked at 3-1 with a soak off. I use a blocker at P39. If I have calculated correctly, the rest of my units are out of range of French 3-1 attacks in the center.
In the east, I do the best that I can to limit what the French can attack at 3-1. They can attack the 2-6 (Sohr) and the 4-4 (Luck) at 4-1 and 3-1 respectively. But that has some exchange risk and potentially a counterattack.
Joe: In the West (Nivelles and the Braine le Comte Road): The PAA commander is now forced to abandon all pretense of defending the Samme River; his only goal, this turn, is to screen Ccoke and the Allied right – from the mixed French infantry/cavalry force at V46 and W46 – long enough for this slow-moving infantry to reach the north-south primary road that runs through Nivelles and then wends its way north towards Brussels. To that end, he strongly garrisons Nivelles, and then begins the retreat of most of the rest of the Allied Right Wing, taking pains to leave a sacrifice/delay unit at R37, and powerful blockers at R39 and P37 to discourage any overly-aggressive French pursuit in this sector. [The garrison in Nivelles, strong as it is, is still vulnerable to a 3-1 (or better) attack, with one soak-off; such an attack, assuming a strong French stack at T38, would also block Cooke from S39 (because of the French ZOCs) and thus, prevent his using the primary road to speed his escape. The only relevant question for the French player is whether such an attack, given the situation elsewhere on the central front, would actually be worth the potential cost?] The decision to abandon the center and left and begin a full-scale withdrawal north towards Mont. Ste. Jean could not have been an easy one for the PAA commander, especially since the local Anglo-Allied contingent around Nivelles, and the Prussian forces farther east were both able to continue the fight in the center, at least for one more turn. On the other hand, the risks of engaging in even one more round of combat on this front were both several and serious. Simply put, for the PAA player to actually hold a line running from Nivelles through T36 to T34 to T32 to Genappe would require at least two 3-1 attacks, two soak-offs, and a sacrifice/delay unit at Q30. And if this wasn't bad enough, one of the soak-offs, along with the delay unit, would both have to be Prussians: a requirement which would immediately and severely limit Blucher's ability to conduct combat operations for the balance of the 17th and half of the 18th.
In the Center: Most of the arguments in favor of an immediate PAA staged withdrawal from the Nivelles-Genappe line have already been enumerated. However, there is one more reason that pertains specifically to the French dispositions around Genappe, and that is this: because the majority of French units (and combat power) are currently more than one turn's move away from the Genappe- Mont. Ste. Jean primary road, it was temporarily possible for the Prussian units around Genappe – assuming some meticulous planning on the part of Blucher – to withdraw northward without having to leave a sacrifice/delay unit to cover their retreat. On the other hand, had the Allies continued the fight in the center, for even one more game turn, then it is highly likely that at least some of the units currently straddling the rivers farther east would have moved closer to the center and hence, would have significantly increased the risk of an immediate and aggressive French pursuit. And given the current shortage of Allied sacrifice/delay units, preserving even one of these precious units for a turn, is no trivial matter.
In the East: This sector continues to plague the PAA commander; mainly because – turn after turn – there just don't actually seem to be any good Allied options, and this turn is no exception. Needless to say, some sort of sacrifice/delay was necessary in order to at least partially cover the desperate retreat of the Prussian infantry away from the Dyle. Unfortunately, the 2-6 at H29 is "too clever by half." [The only explanation for this PAA positional lapse that I can come up with, is that I strongly suspect that the Allied player may have simply overlooked the French cavalry at N24.] As a response, the French player will undoubtedly call on the cavalry at N24 to support Jeannin in a surrounded 5-1versus Sohr , while he orders the balance of his Wavre cavalry to dash past this unit (via the F30-F31-F32 gap) in order to launch 3-1 hasty attacks against the two Prussian 2-6s currently straddling the La Lasne River. Admittedly, the attacking French cavalry could then be surrounded, but so what? Even if both attacks misfired with DB2s (a 9% chance), that unlikely outcome – at least in my view – would still not really leave those advanced French cavalry units exposed to any kind of reasonable PAA counter attack (low-odds, maybe, but that's a real stretch). Obviously, the better Allied delay position would have been at G30 (no surround, and no open path To the La Lasne.) Unfortunately, in that case, the most likely French response, at least in my opinion, would have been to attack the sacrifice/delay unit at H30 at 4-1, and then gamble on a pure cavalry 3-1 attack versus Tippelskirchen, using units from both the Wavre and the Genappe sectors. The one piece of good news for the Prussians on this front, such as it is, is that the Allied retreat towards Mont. Ste. Jean has, as a consequence, moved some badly-needed Prussian units within reinforcing range of the La Lasne defense line. [A final note: One of the other benefits of resorting to an Allied sacrifice of the Prussian IInd Corps Hrs. Arty at B29, besides guaranteeing Kampfen's escape across the La Lasne River, is that this enemy 2-6 cannot really be ignored by the French player and, hence, he will usually tie up ten factors to eliminate it with a surrounded 5-1; and those are ten factors which will then not be available for an attack on the Prussian infantry retreating from the Dyle River on the 1500 game turn.]
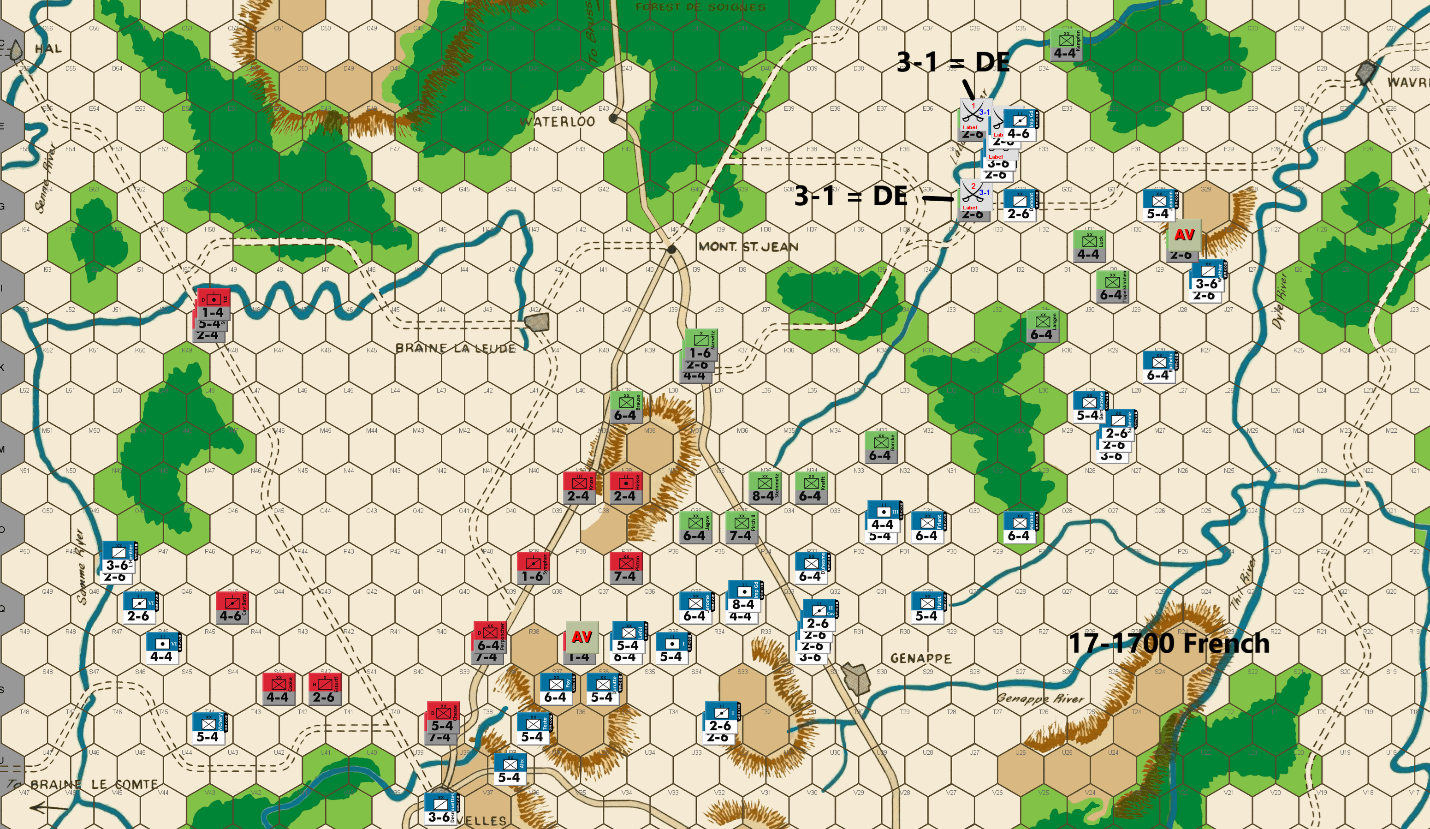
Bert: Woah, this last move by Ed has surprised me quite a bit. I kind of expected him to start withdrawing as he has done in the west, at Nivelles and in the center. What I did not expect was that he would allow my marauding forces in the east to have a direct path to the La Lasne River with two different cavalry defenders that I can get 3-1 attacks against. This has to be a trap of some sort, but I don’t quite see how I can pass this up. I do see how he can surround my units, but only if he is willing to take low odds attacks. I guess that this could be a blunder, but that would surprise me. I thought that I might have inadvertently moved the Sohr unit so that it was not blocking me, but I asked Ed to resend the move and the placement of that piece was not something I had done.
Anyway, I am more than willing to take this shot, especially with me getting the surrounded AV vs Sohr and two 3-1 attacks. I have several units that can support a follow up attack if Ed does indeed pocket and kill my units on a low odds attack. I need the dice to be favorable to me on my attacks so that I can maximize the PAA attrition with this move. I could easily see Ed making those low odds attacks and if they fail, the game will be just about over from my perspective. I really don’t think his position was desperate enough to warrant this gamble, but these games always look different, depending on the side of the table that you are sitting on.
Strap in for some fireworks…, these next few rolls could decide our game!
Everywhere else, I have tried to advance to threaten across as broad of front as possible. My goal is to push Ed as far back as quickly as I can, while forcing him to offer up at least two AV or high odds targets every turn. If I can get more than that, I should be able to wear him down and it will be tough for him to stop me if the dice are roughly even going forward.
[Editors note: The two 3-1 attacks were both DE.]
Joe: In the West: The French raiders in the far west
continue to pressure the Allied Right. Although this force only totals
sixteen factors, it is enough –
so long as it stays out of range of the
PAA "heavies" –
to herd the Anglo-Allied units retreating from the Samme
northeast away from the Nivelles-Brussels Road and towards the open ground
west of Mont. Ste. Jean. This French presence across the Samme, on the PAA
far right, also guarantees that the PAA commander will not be able to
establish and maintain an oblique defense line running from Nivelles north
to the central ridge line in the center.
In the Center: The main body of L'Armee du Nord advances north in search
of battle, picking off the PAA sacrifice/delay unit at R37 as it marches
north. In view of the fact that the Allies will undoubtedly choose to
reform their line using the southern end of the La Lasne River on their
left and the ridge line in the center, the French player can probably look
forward to a couple of turns during which the PAA commander will have to
sacrifice two or more delay units in order to avoid disadvantageous
battles.
[ Properly exploited, this absence of high intensity combat actually
works –
at least temporarily –
to the French player's advantage, as
this game dynamic allows the Emperor to whittle away at the PAA's
dwindling stock of sacrifice/delay units, starting on the afternoon of
the 17th and extending through the morning of the 18th, and if done
properly, with minimal risk.]
And these numbers matter. By the afternoon of the 18th, the Allies will
see the influx of twenty fresh units into the Mont. Ste. Jean battle space,
so every PAA unit –
whatever its combat strength –
that can be eliminated
in advance of those Allied reinforcements' arrival significantly improves
French prospects for victory.
In the East: The opportunity to attack and possibly eliminate two exposed
Prussian 2-6s with 3-1 attacks –
in spite of the possible risk of Allied
low-odds surrounded counterattacks –
is too tempting for the French player
to resist, especially since there is a 91% chance of eliminating at least
one 2-6, a 49% chance of eliminating the two of them, and only a 9% chance
that both 2-6s survive to fight another day. And, as if the Allied
player's original positional error weren't bad enough, the dice then add
insult to injury by rewarding both French 3-1s with D Elims. Farther east
the hapless Prussian sacrifice/delay unit at H29 is also eliminated with a
5-1 surrounded attack. For better or for worse, these results mean that
"the ball is now in the PAA commander's court." Moreover, since French
cavalry now straddles the northern La Lasne River at F34, and most of the
local Prussian combat units are too far east of the La Lasne to use in
reestablishing some sort of plausible river defense, the Allied player has
only two choices: a) Occupy D36 and G35, and allow the French cavalry to
seize a second bridgehead across the river farther north; or b) take the
5-1 surrounded AV versus Domont at G33, and counterattack the French units
at F34 and E34 with two 1-2s, and hope to get very, very lucky!
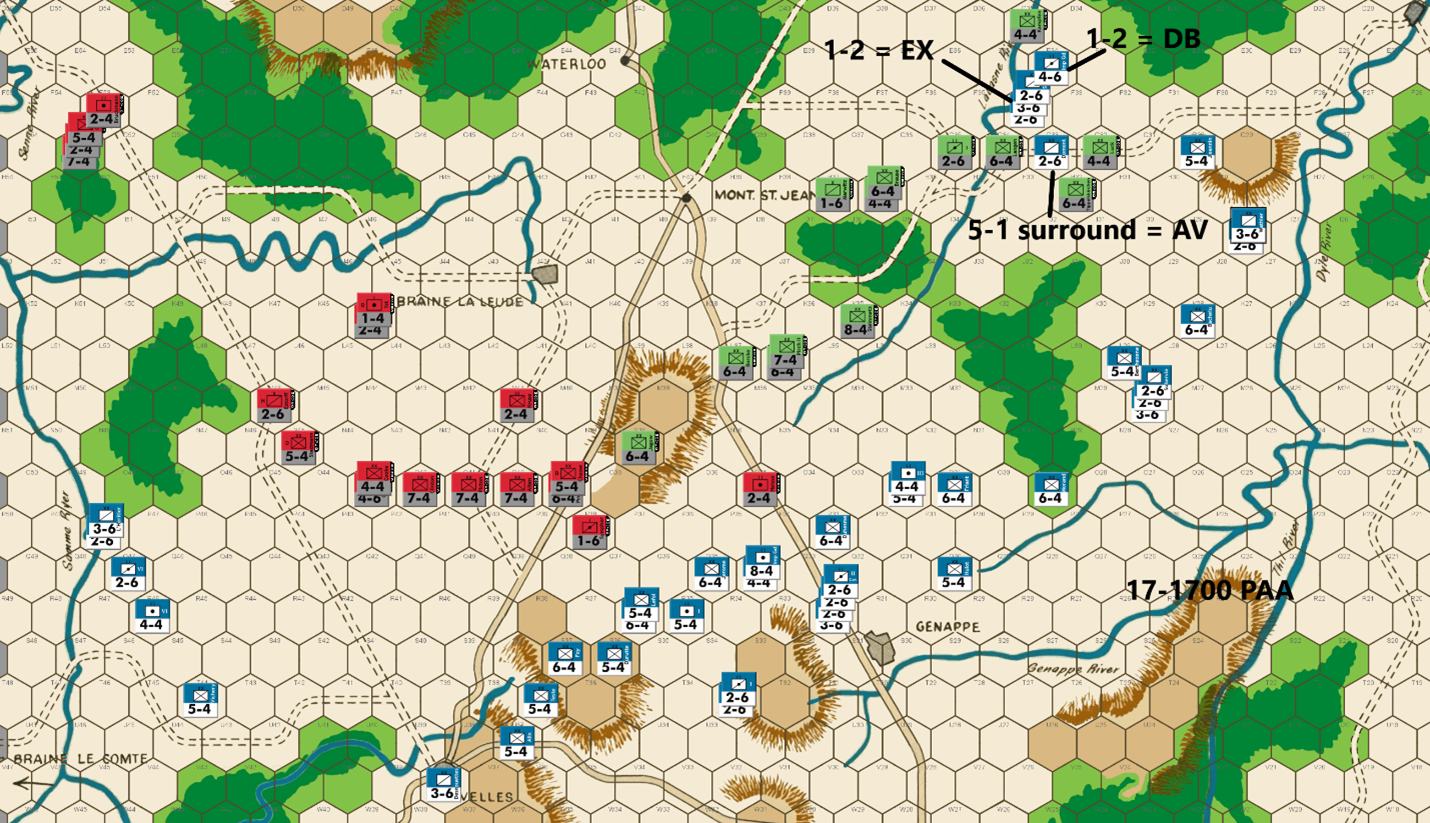
Ed: For reasons that I can’t explain, I overlooked the ability of the French to get 3-1 attacks on my two 2-6s perched on the La Lasne River. Ugh – a major mistake on my part! That plus an AV on another 2-6. Triple Ugh! I cannot afford to give away units like this!
I roll Bert’s two 3-1 attacks, and the dice gods punish me for my blunder with DE results in both attacks. The French still have two more turns to attack before the Prussian Fourth Corps enters the board. The question is how much damage the French can do before the Prussian reinforcements arrive in their rear. The situation is looking bleak for me.
Note: At this point Bert emailed me with the very gracious offer of a redo. As he expressed it:
“I’m thinking I should allow you to move Sohr where you intended & I adjust my move. I really don’t care about winning all that much. I’d hate to have our eventual audience disappointed over the game being probably decided by a blunder of the first order instead of having them learn more (hopefully?) from Joe’s analysis of our moves that just have poor choices & minor blunders instead of first order blunders.
My main passion for this particular game has been to provide our eventual audience with an educational experience that might get other players to give this game another look and provide them with an opportunity to become competitive players more quickly. … Having it suddenly blow up due to a major unforced error might lessen the effectiveness of our endeavor, which is the main reason I made my offer. … I've won my share of championships and so while that is always fun to do, it won't have the potential to be an enduring impact for the hobby like our documentation has the potential to do. I seriously don't care if I win or lose as long as my contributions end up helping those that want the help.”
Joe voiced his support for such a redo, as well.
While I very much appreciated the offer, I want to maintain the integrity of the championship match. I suggested we continue to determine the champion in this, the real game. It may be over quickly; in which case Bert deserves the Championship. We can then proceed with the redo of my move and use that game for the rest of the commentary. Bert and Joe agreed and that is the plan.
So, we carry on … at least for a turn or perhaps more. I continue to withdraw in the west and center offering two blockers to protect my infantry. In the east, there is a chance to salvage the situation. The French that attacked my cavalry have left themselves open to surround counterattacks, albeit at low odds. I can get surround attacks on four of his units if done in the proper order. First, I take the 5-1 surround attack on Domont using Langen to block any retreat for an AV. Second, Langen attacks the three horsemen at 1-2 using Kampfen at D35 to block any retreat. Kampfen then attacks the Imp Gd HA from the river at 1-2. This plan offers at least a 40% chance to eliminate four units. That is pretty good odds from where I sit right now.
The dice gods do an about face and reward me on the critical attack with an exchange on his three units. For a little icing on the cake, I also get a DB against the Imp Gd HA. That is four French units to the dead pile for one Prussian – a very favorable trade for me. It also assures that Tippleskerchen and Luck will not be subject to surround attacks. My situation has improved, and we will play on for a while.
Joe: In the West: Since his options on this front are limited, the PAA commander chooses to fall back on the Anglo-Allied reinforcements marching southeast from the road to Hal entry hex. [The only change in this sector that I would have made would have been to position Estroff at N44 rather than M46.] Although there is a small chance that the French cavalry might raid north towards the ford at I50, the fast-approaching units marching up from the road to Hal should make such a French adventure both unlikely and perilous. It is the open terrain between the Samme River and the Nivelles-Mont. Ste. Jean Road that presents the Allied player with his greatest challenge. With no sacrifice/delay units positioned to protect the Allied battle line that extends from O4 to O43, the threat of one or more French attacks (albeit with soak-offs) in this sector are obvious. Unfortunately, in order to protect Cooke's retreat, the PAA player has been obliged to form his line a little farther south than he might otherwise have preferred; so now, all he can do is await Napoleon's decision, and should the Allied line be attacked, the verdict of the dice.
In the Center: A sacrifice/delay unit at O35 and another at P38, allow the Allied commander to temporarily establish an economical (in terms of unit count) doubled defensive line extending from the southern end of the La Lasne Rive to the ridge line in the center. This is important because he needs to send every spare Prussian unit he can lay his hands on east to reinforce (hopefully) the crumbling defense of the northern La Lasne River.
In the East: Desperate times call for desperate measures, and very few situations in WATERLOO are more desperate for the PAA player than an early (before the arrival of the Prussian IVth Corps) large-scale French breach of the northern La Lasne River defenses. That being the case, the Allied commander decides that, in order to retrieve his position in the east, he must place his faith in the dice. First, he attacks Domont at 5-1 surrounded (AV); next, he uses Langen to attack the French cavalry stack on F34 at 1-2 surrounded (Exchange!); and finally, he orders Kampfen to make a cross-river attack -- and advance, if possible -- against the Imp. Gd. Hrs. Arty at 1-2 (DB2!!). Although these combat results are not perfect (there was only a 4% chance of two DB2s), they are pretty darn close (only a 16% chance of two winning outcomes). What is interesting about all this is not that the PAA commander did not roll two A Elims (there was only a 9% chance of that), but that, by winning both 1-2s, he not only salvaged his river defenses, but he also managed to save Tippelskirchen and Luck from the certainty of being surrounded by a French commander bent on revenge on the 1900 game turn. In addition, in spite of his exceptionally good luck, the PAA player still ended up losing twelve factors (and four units) to the French player's loss of nine factors (and four units); and not inconsequentially, Tippelskirchen and Luck will both still have to survive another round of French attacks before they can finally seek safety on the west bank of the La Lasne River. All in all, a short-term (if nerve-wracking) win for the Allied commander, but still a long-term, if slight, advantage for the Emperor.

Bert: That was a fairly expensive battle at the La Lasne River as it turns out it was indeed a blunder by Ed and not a trap. In the end, the result turned into pretty much a trap as the PAA was able to hit a couple of good rolls on their low odds counterattacks to destroy three French pieces in addition to killing the blocking piece that was offered up to provide protection. The second attack resulted in a defender retreat which allowed the attacker to advance into a favorable blocking position. Overall, the French can’t complain too much since both of the original 3-1 attacks scored very favorable D Elim results. The battle will continue further this turn as I’m taking a 6-1 attack on his 4-4 (Luck) unit and looking for my own Exchange result on a 1-2 attack versus his 6-4 (Tippelskirchen) unit. I suspect that no matter the results from these two attacks, Ed will probably break off the engagement and take up doubled defensive positions behind the river. Next turn, his significant Prussian reinforcements will be entering the field from the east and it won’t take them long to approach my units to potentially surround them.
Elsewhere as we reach the end of the second day of this battle, the French command has little to complain about overall. I feel that both the attrition and the board position favor my side, although nothing it to be taken for granted as it only takes a couple of attacks to complete flip the script at this point of the game. My approach this turn is to keep the pressure on at a very high rate across the rest of the front.
In addition to my 1-2 attack vs Tippelskirchen, I’m launching two other 1-2 attacks against a couple of his heavy infantry units. Those attacks are all soak off attacks that could cause him “unexpected” damage. I need to make those soak off attacks to support the other attacks that I have ordered, and so the choice I made is to either take lower odds attacks that risk smaller French pieces or risk some larger pieces to have the shot for that unexpected damage. I understand that accept the risk of losing more than I should, but the potential reward is worth it in my calculations. Of course, I wish that I had a 4-4 infantry unit in range of Picton, but alas I don’t and so that attack will cost me a 5-4 infantry unit instead should I suffer a loss on that attack. The (20%) possibility of an exchange against one of his 7-4’s made me take that risk, as opposed to just soaking with a 2-6 unit.
I’ve exposed some French units to non-surrounded counterattacks, but with the PAA already in a weakened position with regards to total number of pieces remaining, I can’t imagine Ed launching any counterattacks that require a soak-off unless he has reached a point of desperation… and I don’t think we are there yet.
In addition to the two AVs that I took this turn, an additional six PAA pieces run the risk (only a 20% chance on each of the three 1-2 attacks) of being eliminated in these attacks. The PAA can’t maintain losses of 4+ pieces per turn and expect to hold the line for two more days of attacks. On the other side, five French pieces could be lost in these attacks, which would definitely put a crimp on my attacking force going forward. This will be another turn where I am eagerly awaiting the die roll results.
Joe: In the West: Up until now, I have generally been impressed with the French player's handling of operations in the west. This is because the Braine le Comte-Nivelles sectors -- especially in expert competition -- can be very challenging for both sides, and even seemingly small errors during the early game turns can come back to haunt a player in the middle and end game. In the current match -- at least in my view -- except for a couple of minor missteps, this French commander has otherwise hardly "put a foot wrong" thus far in the campaign. That is, until now. However, before I catalog my specific issues with the current French move in the west, I probably need to explain the logic that underpins my critique of the French commander's play in this particular instance (warning: some simple math and a bit of tedious exposition is involved, so scroll past the following section highlighted in red, if you just want to see my specific criticisms). [First, and at the risk of stating the obvious, I will begin by making a couple of simple numerical comparisons between L'Armee du Nord (at full strength: fifty units and 193 combat factors) and the Prussian/Anglo-Allies (fully reinforced: seventy-eight units and 237 combat factors). Obviously, in both total number of units, and in total combat factors, the PAA (once reinforced to full strength) enjoys a substantial advantage over the French; however, it has been my experience that many players simply do not appreciate either how or when those differences actually begin to influence the flow of the game, or how different their impact on play actually is. So, with that in mind, let us use a bit of basic math to clarify these differences. In the case of combat factors, the PAA enjoys a 22.8% advantage (237-193 = 44/193 =.228); on the other hand, when it comes to the unit differential between the two sides, the Allies enjoy a 56% edge (78 - 50 = 28/50 = .56). Clearly then, the PAA advantage in unit count is significantly greater than is their advantage in combat factors. And this, at last, brings us to my somewhat controversial personal conclusion: That maximizing the early (pre: 18 Jun 0700) elimination of Allied units (while minimizing the loss of French units) is far more important for French prospects of ultimate victory, than is the infliction of disparate casualties on the PAA at the cost of roughly comparable unit losses. Stated differently: If the French player concentrates on eliminating Allied units, while preserving his own, then the disparity in combat factors will tend to take care of itself. Second, that the tactical value of certain PAA units diminish once the game's action moves north of the Nivelles-Genappe line. What I mean by this is that, during the first day and a half or so of the campaign, the initial batch of PAA 7-4s, and the lone Prussian 8-4 serve as critical lynch-pins for the Allied player's defensive arrangements throughout these perilous early game turns; on the other hand, once the action moves north towards Mont. Ste. Jean, then I would argue that these units all become significantly less important, mainly because the opportunity for the PAA commander to utilize doubling terrain markedly diminishes. Moreover, because of the stacking problems these "large" units can pose when attacking (e.g., two stacked 7-4s cannot accommodate any soak-off unit other than a 1-4 or 1-6, and most, if not all, of these "1" strength units will usually already be in the "dead pile" by the later stages of the game), smaller units are often more tactically useful because of their flexibility when it comes to stacking. In short, during the early game turns, any one of the PAA 7-4s, or the Prussian 8-4 should be considered "high value" targets and – especially if not doubled – well worth it for the French player to risk incurring higher than normal soak-off and/or exchange losses just to remove them from play. Later on in the game, however, a prudent French commander will often, when practicable, eschew attacks against these Allied "heavies" and seek, instead, to attack smaller strength units against which it is usually easier both to achieve attractive odds, and to avoid awkward, expensive exchanges.] Before I get into the specifics of this critique, I probably should note that my view of the effectiveness of any player's specific game actions is always "risk/reward-based," and never "outcomes based:" for example, whether an attack actually succeeds or fails is never the criteria by which I judge a move, but only by whether a player's decisions – given the game situation at the time – were generally reasonable and constructive, so far as the long-term goal of victory is concerned. That said, my first major "nit" – when it comes to this turn's French operations in the west – must go to the ill-conceived French 4-1/1-2 attacks versus Estroff at M46 and Stedmann at N45. This lapse is particularly surprising as this French player, in previous game turns, had masterfully maneuvered this small detachment against the Allied Samme defenses, and had effectively breached the river barrier without fighting a single battle. In this case, however, the French commander – at least in my opinion – decided to risk far too much, for way too little potential return. The first issue that I have with this pair of combats is actually a general one: the conservation of forces. In essence, because of previous cavalry losses (seven 2-6s and one 3-6), the French player simply does not have a lot of cavalry left to waste; in fact, on the main front (the west and center), the Emperor's cavalry arm has been reduced to ten units, of which 30% will have been placed at risk in order to execute the strategically unimportant, and highly risky attrition attack against Estroff. Moreover, even in the unlikely event that the French attack was to be completely successful (a D Elim versus Estroff, and DB2 or Exchange against Stedmann), the attacking force – because of the noticeable paucity of nearby French supporting units – would still be vulnerable to a powerful PAA counterattack. Unfortunately for the French commander, the actual results of these two combats were the worst possible: a DB2 and an A Elim. However, even if these particular combat results had been optimal, I still think that it would have been far better for the French player to have held these units back, out of range of the local Allied "heavies," so that they could have continued to exert flanking pressure against the PAA Right as the game action moved north. Looking a little farther east, we come to my second major "nit:" the highly risky trio of attacks (one 3-1, one 1-6, and one 1-2) versus a 7-4 (Alten) and the units covering its flanks. My main problems with this set of combats are twofold: first of all, it accomplishes nothing in terms of position as the Allied battle line would have to either retreat or fight under unfavorable terms, even if Alten had not been attacked; and second, it risks four units (and fourteen factors) in order to achieve 3-1 odds against Alten (60/40 risk reward), a 1-6 versus O39 (80/20), and a 1-2 (using Lefol, a 5-4) versus Picton (30/70); as things turned out, luck actually favored the French player in this instance, as he eliminated Alten, survived the 1-2 versus Picton, and lost only the Ist Corps Hrs. Arty (a 2-6) in the 1-6. Nonetheless, despite the fact that this particular battle produced a French victory, I personally think that the downside risks associated with this specific set of attacks were simply too great, especially when weighed against the potential benefits of their success.
In the Center: The French move in this sector basically makes itself. The only Allied targets worth considering are the two sacrifice/delay units (one at O35 and the other at P38) which are eliminated without difficulty. Other than that, I suppose that one could quibble about a few of the French front-line dispositions, but once the decision was made to initiate an attack against Alten, the issue pretty much became moot, as there weren't really very many units left for the French player to redeploy.
In the East: Just as was the case with operations in the center, the French move in the east essentially makes itself. The only real choice that needed to be made after the obligatory 6-1 versus Luck is organized was whether to risk a 2-6 (for a 1-3) or a 3-6 (for a 1-2) in the required soak-off against Tippelskirchen. In this case, the French player opted for the 1-2 and is rewarded with an Exchange, which is probably fortunate, as the 6-1 misfired with a DB2.
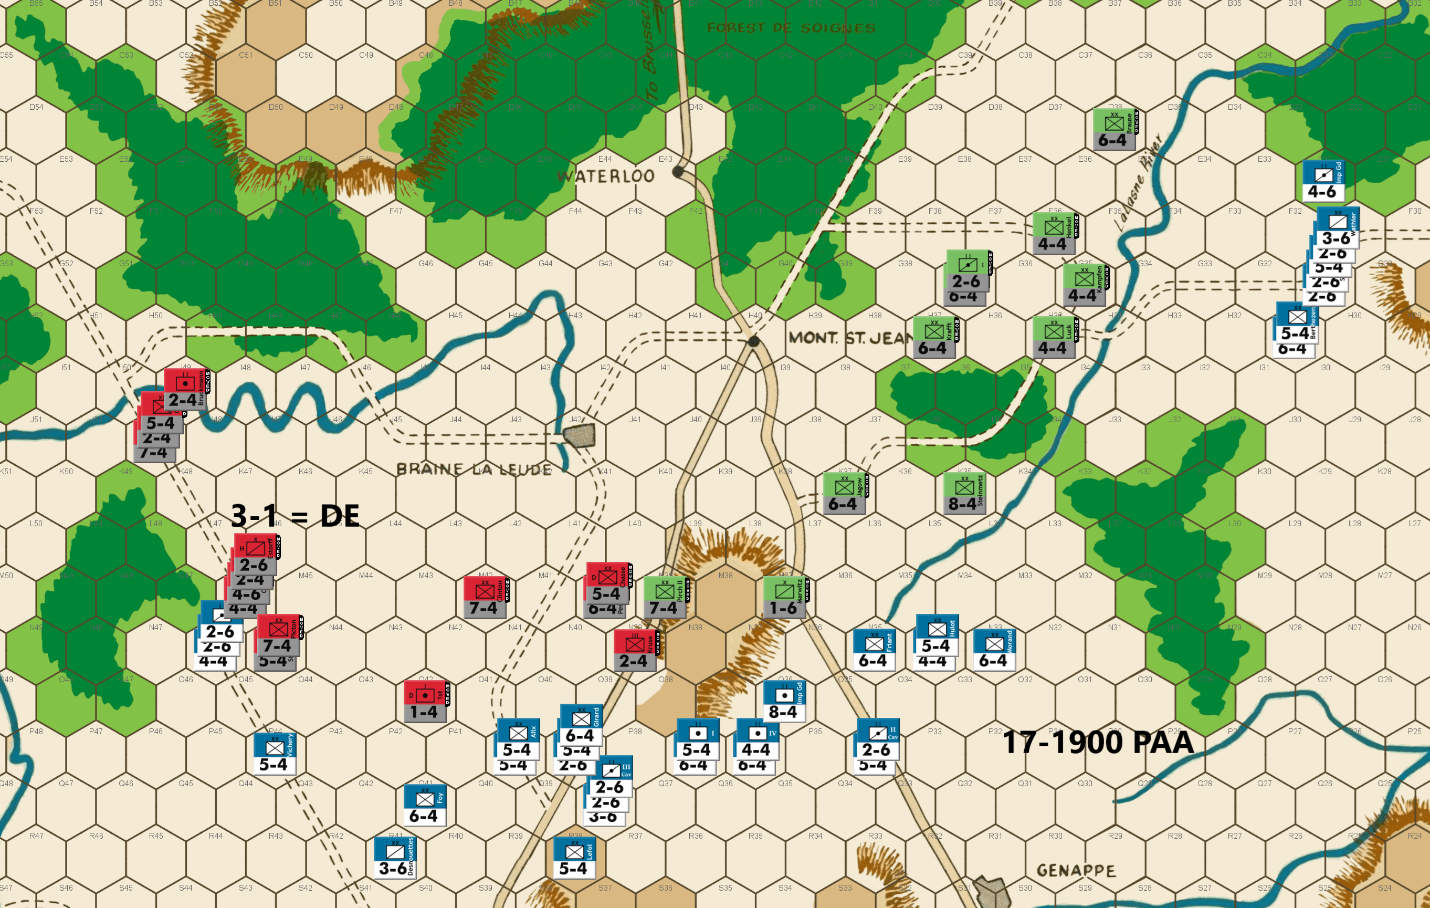
Ed: Bert’s attacks were a mixed bag with something for both of us. The French are still favored, but I now consider my situation far from hopeless. The eliminated unit count favors the French by only 23 at this point vs the PAA total unit count advantage of 28. It seems likely that I will have a few more units than the French once tomorrow’s 7am reinforcements take the field. And if the French stick around east of the La Lasne River, the Prussians will see action earlier in the day than normal. We may even have combat-strength parity.
There is another opportunity in the west. Bert’s poor attack results have left three units open to a 3-1 attack which I go for. If I can eliminate them, that will be a big boost to the PAA chances. But I also have to keep the French as far away from Mt. St. Jean as I can. Sadly, the best I can come up with requires three blockers in the center with 3-1 proof infantry flankers. Bert may decide to take some low odds attacks against my infantry, but I will risk that.
I can defend the La Lasne River along most of its length. But I can’t cover it all and I leave it undefended in the far north. To be effective he will need to devote significant strength to the bridge head. Will he want to commit that much with the impending arrival of the Prussian Fourth Corps?
Combat Results: Luck is with me again as I get the DE on his three units in the west. That is seven French units eliminated in two turns. The French are now down to 31 units. With the arrival of PAA reinforcements next turn, I will be up eight total units. It will take the Prussian Fourth Corps (nine units) most of the day to arrive at the central front. But the French have eight units in the eastern theatre as well. If the French hang around, the freshly arriving Prussians can bring pressure to bear earlier than normal. Things are looking very much better right now for the good guys. I will be interested to see what the French choose to do over the next few turns. Will he hang around in the east, threatening the La Lasne River defense?
Joe: The complete failure of the French attack against Estroff in the far west creates a "golden" opportunity for the PAA commander to eliminate, once and for all, the enemy threat to his right flank, and he seizes it in fine form by attacking the eight factor French stack on N46 at 3-1. [I should note that this counterattack is not as risky as it might first appear because, at this stage in the game, even an uneven Exchange tends to work to the Allied player's advantage.] However, unlike his Gallic counterpart, the PAA commander's attack does not misfire, and the three targeted French units all make the trip to the "dead pile," thanks to a D Elim combat result.
In the Center: The Allied player, in order to screen his center and to also shield his attacking force in the far west, has been obliged to deploy three of his precious sacrifice/delay units to cover his front. This move temporarily reduces his local store of available sacrifice/delay units from six units down to three. While this is a valid concern for the Allied commander, events in the far west will almost certainly shorten the PAA front and, more importantly, a sizeable influx of fresh sacrifice/delay will soon enter play on the road to Brussels. In addition, reinforcements marching south from the road to Hal, are now only a turn or two away from the Mont. Ste. Jean battle area.
In the East: Some very good luck, along with the timely arrival of Prussian reinforcements, has successfully plugged the French breach of the La Lasne defense line and – at least for the time being – averted a genuine Allied crisis. A French cross-river attack is still possible, but with a defending Allied force which now slightly outnumbers the local enemy contingent, the danger of a breakthrough on this front appears to have passed. Moreover, starting next turn, the French commander will not only have to deal with the substantial Prussian force lurking just west of the La Lasne River, but also with the possible arrival, in the French rear, of the powerful Prussian IVth Corps marching in from the east.